Sizing Suggestions for the Lanai Wireless Pattern
Our wirefree bra patterns uses a combination of measurements such as bottom cup depth (BCD) AND horizontal hemisphere (HH) to determine size - much like our wired patterns. More measurements = fewer muslins! Today's post will feature how to mix and match sizes for those who do not fall squarely within a specific size.
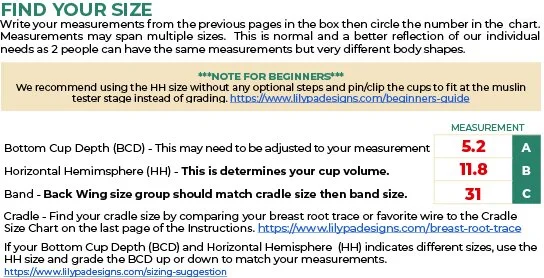
Here’s a sample of someone’s measurements. Lets call her Gemma.
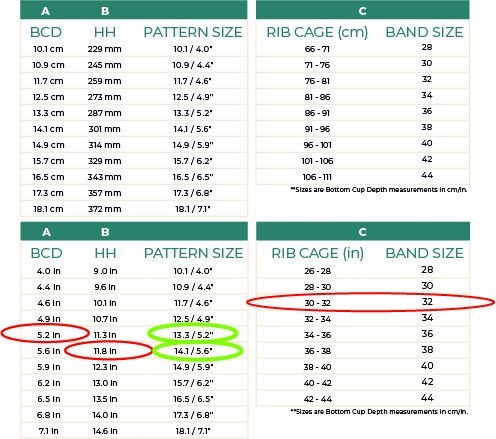
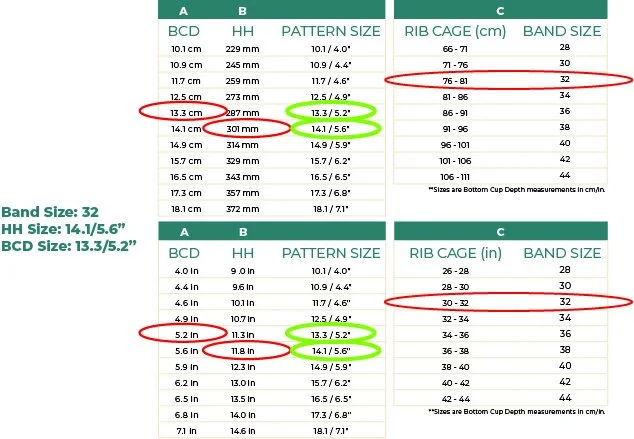
In our sample, the measurements indicate:
Horizontal Hemisphere - size 14.1/5.6”
Bottom Cup Depth - size 13.3/5.2”
Gemma’s measurements indicate 2 different cup sizes - no wonder Gemma had difficulty finding a comfortable bra in stores! One of the great things about sewing is the ability to adjust a pattern to fit YOUR body. Before we get into mixing and matching pattern pieces, we’ll need one last piece of information - breast root trace for the cradle size.
The key to getting a wireless bra to tack (bridge area between the breast touch the chest wall) is a curve that matches the breast root (that crease under the breast) AND a center gore tall enough to FULLY encapsulate the breast AND cups with enough depth to enclose it all.
In our sample, lets just say Gemma’s breast root trace matches the 12.5cm/4.9” cradle size. Combined with the HH of 14.1cm/5.6” and a BCD of 13.3cm/5.2”, this would indicate 3 different sizes! Here’s what to do:
CRADLE
Start with the 12.5/4.9” cradle since that best matches your breast root/well fitting underwire. Be sure the base curve matches but the overall opening can be narrower as it it wireless (and can help with support/lift). Select your back band piece based on your cradle size and you’re ready to roll.
CUPS
Since your HH is larger than the BCD, start with the larger cup size and REDUCE the BCD to fit. Since the actual cradle needed is smaller than the HH size, you may need to add small darts or gather the “wireline” of the cups to fit. A detailed tutorial on reducing the BCD is available [HERE].
If your HH matches your BCD, but does NOT match the cradle, make the cups fit the cradle. This may require you to gather the “wireline” or add some tiny darts in the seamlines. Dart Tutorial Link [HERE]
If your HH matches your cradle, but does NOT match the BCD, increase/decrease the BCD to fit your body.
If your HH is smaller than your Cradle, you have a few options. You can add the difference to the “wireline” of the cups leaving the cradle as-is (recommended for wired bras). Or you can also simply cut off the excess from the cradle. This option is unique to wireless patterns and the Lanai in general due to the extra tall side seams. If you choose this option, make sure the center registration mark on the cups lines up with the marks/seam of the cradle.
As always, we recommend making a muslin to test out any new bra pattern before jumping into your nice fabrics. Just make sure your tester fabrics have the same stretch percentage as the final fabrics to ensure proper fit. Unlike a wired bra, a fitting band won’t be of much help here BUT printing out a copy of the center bridge (remove the seam allowance) on cardstock then holding it up to the body for a quick visual confirmation of bridge shape and height will. Combined with some wash-away-thread, and it’s possible to complete a few trials in a single afternoon!
If you are a beginner or this just sounds too complicated, cut out your HH size to start and make your muslin. Any alterations that may be needed will often become clear once you’re wearing a sample.
***You could technically copy your breast root trace onto the cradle pattern pieces for a truly customized fit!


