Cart 0
Cart 0

 Getting Started Guide to Bra Sewing

Sewing your own bra can seem incredibly intimidating at first. We’ll help you navigate this new world with sewing patterns, terminology and some guidance (checkout our Consider Bra Making Series for an overview) to make the process easier, faster and more wallet friendly.

Setting Expectations

Getting started on your bra making journey begins with a bra pattern. Like regular clothing patterns, bra patterns come with a list of recommended materials and the size range the pattern was designed for. [link to lingerie making glossary HERE] [link to anatomy of a bra HERE].

While its really tempting to purchase one of the beautiful bra making kits available online first, resist the urge until you have selected your pattern. Some bra patterns require stretch fabric while others require non-stretch. To make getting started easier, some of the online retailers sell bra patterns AND bra making kits specifically tailored for the pattern. See the Consider Bra Making Series for more details on how to select a pattern as well as a primer on breast shape and terminology.

Your first bra will likely not fit out of the packet. This is partially due to the fact that breasts of the same volume come in different shapes, densities, orientation and root width. That’s the just breast! Torso shape and even the location of the ribs can affect bra fit. For this reason, we recommend making a bra muslin and saving the nice fabrics for later.

There is ALOT of information about bra sewing and particularly, bra fitting. Give yourself the grace of time to process the information then jump on in! Bra Making in particular is not only very hands-on but also often involves self reflection (ie. How is the fit of my current bra? Do I need smaller wires, more cup volume, tighter band, etc.). Bra making is not dissimilar to custom wedding dresses in the sense of style preference but also fit (tight here, but loose here, etc) and the number of fittings involved.

Muslins & Fitting Bands

Making a muslin and/or a fitting band can really speed up the fitting process while keeping the cost down. Add in some wash-away-thread and you can achieve this without unpicking any stitches! It can also save you a bit of heartache (ie. Used a gorgeous bra kit to make a new pattern without a muslin first and it doesn’t fit). While we’ve highlighted our favorite way to make a muslin (with wash-away-thread!), there are a few other methods [Sew Busty - Cups, Sew Busty - Bands, Cloth Habit, etc]. Some are better suited for smaller cups and bralettes while others feature traditional dressmaking techniques.

The number of muslins needed depend on the body shape but also learning style. It could take 3 tries or 33 tries. Fear not! We have a few tricks up our sleeve that can help minimize the number of muslins needed.

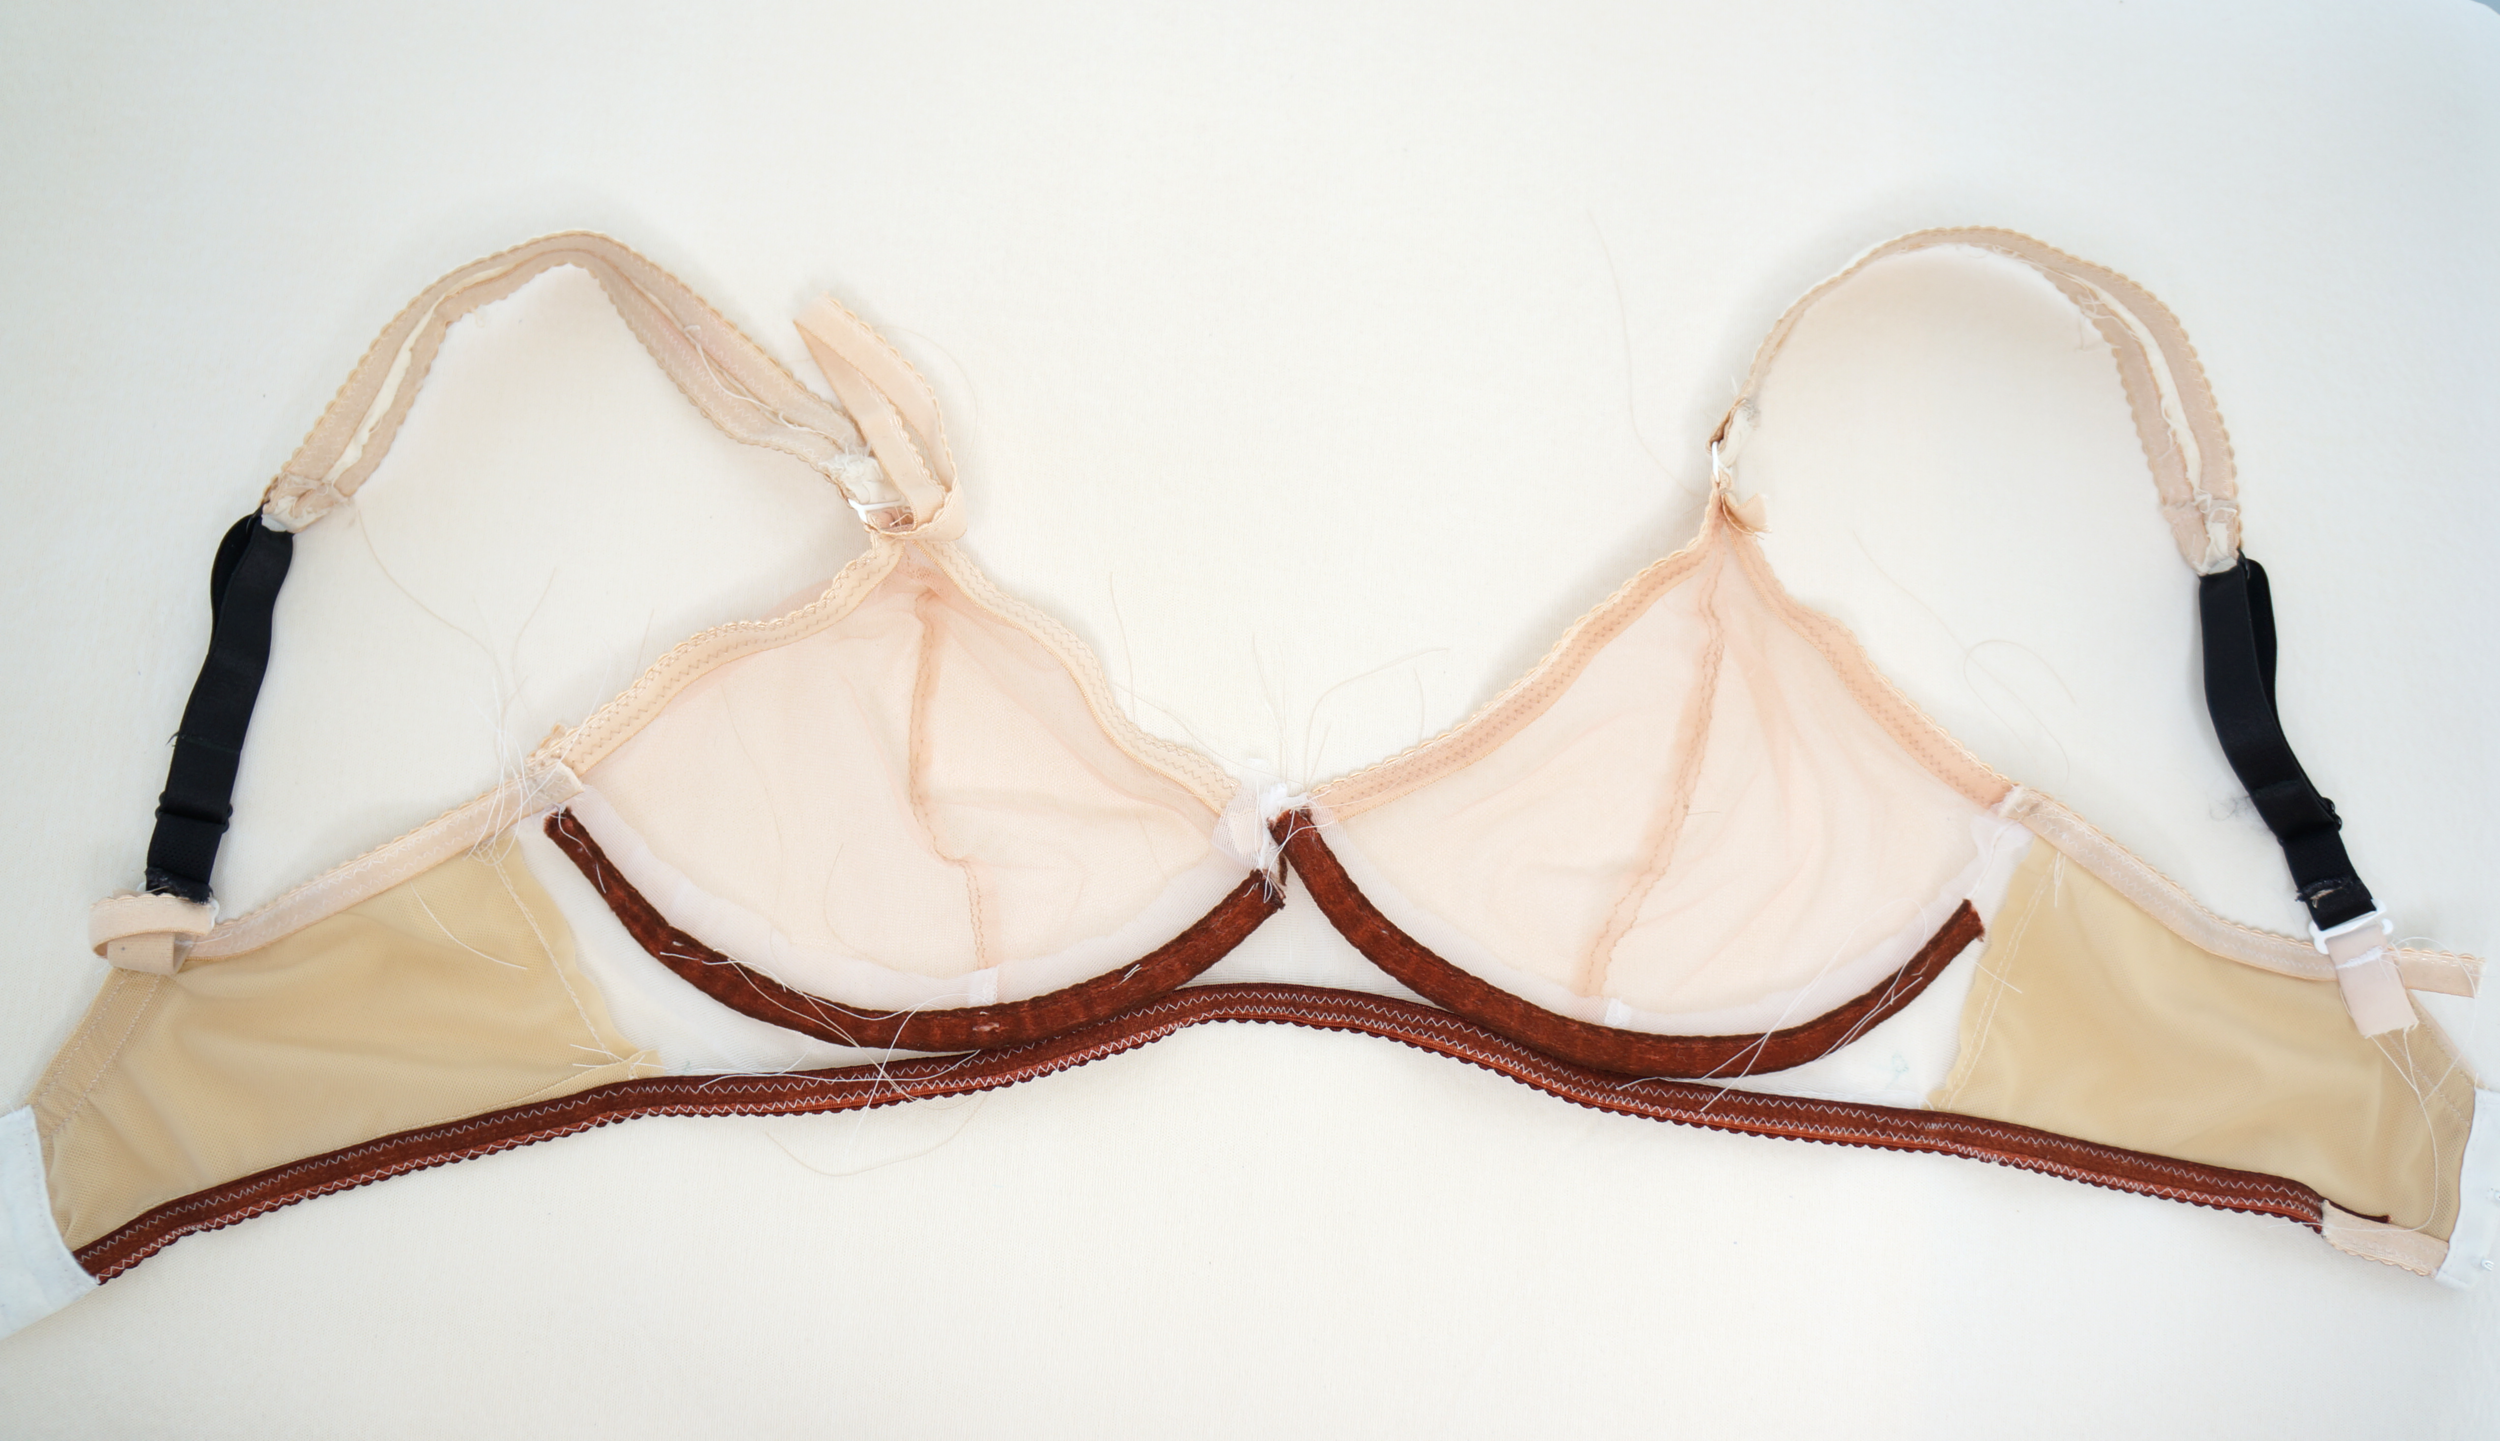
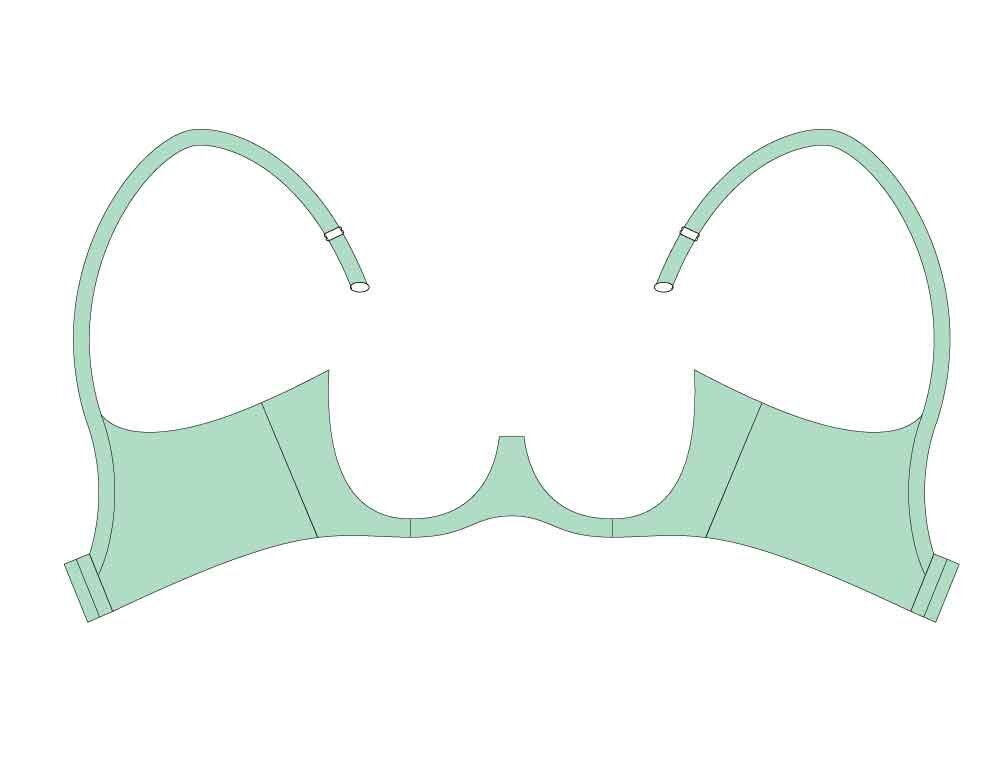
A fitting band can be used to confirm the underwire, the shape of the center gore and the wing drop. Once the fitting band has been perfected, you can baste tester cups into it. Any fit issues with the bra can then be attributed to the cups through the process of elimination.

Fitting Band.png
Fitting_Band_easy.png

Fitting Order

There is a recommended order to the bra sewing fitting process. We don't want to spend lots of time getting the cups to right only to discover it was the underwire all along and need to start over. While its possible to get a well fitting bra without following the recommended fitting order, this tends to speed up the process as it helps narrow down possible fit issues through the process of elimination. When combined with some wash-away-thread, it can significantly reduce stress (of unpicking), heartache (from a beautifully made bra that doesn’t fit), time (multiple tester cups in a single afternoon), and money (reduced muslins).

For this reason, we recommend the following order of operations for bra sewing:

  • Underwire (if applicable)

    • We HIGHLY recommend taking a breast root trace to facilitate this. Once you have your root trace, you can compare that shape with the underwire chart of your favorite vendor. Underwires come in multiple shapes, sizes, gauges and lengths! Be sure the underwire guage (thickness) is appropriate for your breast volume.

      • Most recommend ordering a few different sizes at once. Try add a few sizes larger for a leaning trace and a few sizes smaller for a standing trace. Firmer wires have less flexibility and may require sizing up. A few additional sources on root traces HERE and HERE.

    • A fitting band can help confirm fit of the underwire AND cradle AND band while allowing you to baste in tester cups WITHOUT making an entire new bra.

  • Cradle and band

    • The bit of fabric under the breasts should fit the torso well. In particular, that little triangle between the breasts should match your body shape - from breast crease to breast crease. Sometimes that means a wedge needs to be added/taken away.

    • The band that wraps around the body should follow the natural contours of the torso without gaping. Adjustments maybe taken out at the side seam or in the back band.

  • Cups

    • Start with cups of the correct volume - even if the shape doesn’t match yours - as its easier to shift volume distribution around than to add or take away. Making paper cup is a fast and economical way to check shape and projection. It’s also a great tool when shifting seams around - just remove the seam allowance from your pattern pieces and tape together!

    • Bust point of the cup should line up with the bust point of the breast. Moving the seam to better align with the body changes the way breast volume is distributed. This one change can eliminate several fit issues at once and worth doing early on.

    • Straps should sit comfortably on the shoulders without falling off. For some styles this is directly above the bust point (ie. LilypaDesigns Lanai, Cloth Habit Watson, PUG Classic etc) while others it should be a little further out (ie. LilypaDesigns Labellum, Cloth Habit Harriet, Emerald Erin Black Beauty, etc).

    • Lift and style lines can be addressed after volume and volume distribution to reduce the number of variables with each change as well as utilizing the well fitting cup as a sloper.

For a hands-on demonstration of some common bra fitting alterations, check out our online course HERE!

How to Choose A Size Set 

Our patterns use actual breast measurements (instead of chest circumference) for more accuracy and few muslins [How to Measure video]! For this reason, please use your measurements to determine size(s) instead of your RTW size.

There are 2 main questions we will address:

  • Which size set should I choose if I’m on the border?

  • What are the differences between the size sets?

Each of the size sets have at least a 2 size overlap for convenience but they are NOT identical as each size set was drafted for different breast shapes. Cup pattern pieces cannot be interchanged with the equivalent pattern piece in another size set without alteration.

  • The A-DD range in comparison was drafted for wider breast roots + less projection + wider center gore (3/4” or 20mm).

  • The DD-GG range was drafted for narrow breast roots + lots of projection + narrower center gore (3/8” or 10mm).

  • The GG-KK range was drafted for significant inner fullness with very rounded breast shape + even more projection + narrower center gore (3/8” or 10mm).

If you’ve tried our underwired bra patterns, you’ll find a smooth transition in terms of consistent sizing and fit. [Primer on Breast Shape HERE]

STEP 1

When in doubt, start with your actual measurements! If your HH (Horizontal Hemisphere) and BCD (Bottom Cup Depth) are anywhere on the chart for the size set in question, then the that’s the one you should use. Remember that your HH is your cup size and lengthening/shortening the band is straightforward enough for complete beginners. [Primer on how to measure HERE]. Also compare your breast root to the cradle size charts - the shapes are different as they are drafted for different breast roots. Learn how to adapt a cradle from one size set to another HERE.

STEP 2

In some cases, your measurement may span 2 different size sets. In this case, select based on breast SHAPE. If you have more inner fullness and/or projection you have, err on the side of the larger size set. It is much easier and intuitive to adjust the band (including the wireline) vs adjusting the shape of a 3D cup pattern.


As always, if altering bra patterns feel overwhelming right now, simply cut out your HH size for ALL pattern pieces for your muslin. Any modifications needed will become clear once the bra is on the body. There’s lots of great support, advice and encouragement in our Facebook Groups [LilypaDesigns Pattern Group]!

Don’t forget to check out our Sizing Suggestions and/or our How-To Video if your measurements span multiple sizes.

 How to Take a Breast Root Trace

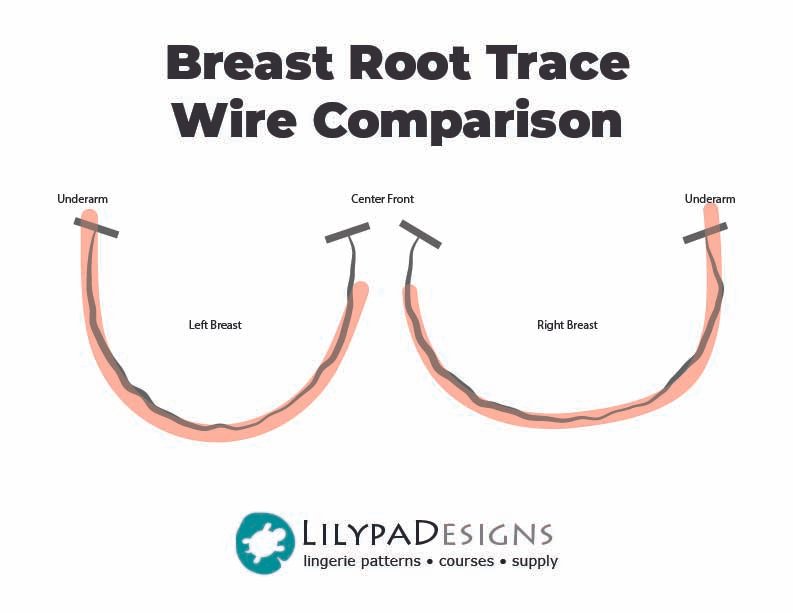
If you’ve spent any time researching the art and science that is bra-making, you may have stumbled across the term “breast root trace”. This copy of the crease underneath your breast (AKA Inframammary Fold or IMF for short) will help you select an underwire (and in some cases, wireless bra patterns such as the Lanai) that best matches your body. A perfect or near perfect match is one of the keys to a pain-free underwire bra wearing experience.

What is a Breast Root Trace?

A breast root trace is an approximation of the shape of your breast root. The trace is generally done by using a flexible curve ruler (the drafting type with a bit of metal in the center) as it is available in art supply, office supply and fabric shops. Other materials such as gear ties, copper wire, larger gauge floral wire, bonsai wire, or picture frame wire can also work. In a pinch, a rolled up piece of aluminum foil will give a rough idea as well. For the truly intrepid, a Contour Gauge Duplicator (used in construction) may also be up to the task.

Why do a Breast Root Trace?

A Breast Root Trace is particularly important in underwire bras as this crease is where an underwire SHOULD reside in order to transfer the weight of the breast to the torso. This allows the body to take on the bulk of the weight/support to reduce the strain on neck and shoulders. [Additional details on wired vs wireless bra support, click HERE].

Breasts not only come in different sizes (volume) but also different shapes, heights, densities and orientation - all of which affect the shape of the breast crease. In short, two people with the same breast volume (bra size) can have very different breast root shapes leading one or both to have wires jabbing into them. [Additional details on different breast shapes, click HERE}.

Underwires ALSO come in different shapes, styles, densities and lengths. The key to wired bra nirvana is finding a wire that matches your body.

How to take a Breast Root Trace?

While there are already a few resources online on how to take a breast root trace [HERE and HERE], our approach is slightly different. Check out the demo video!

Smaller and/or Self Supporting Breasts

Begin with your larger breast and raise the corresponding arm above your head. Using your free hand or an assistant, use the flex ruler/wire to press the ruler around the breast crease (Inframammary Fold or IMF) with one end toward the middle of your chest.

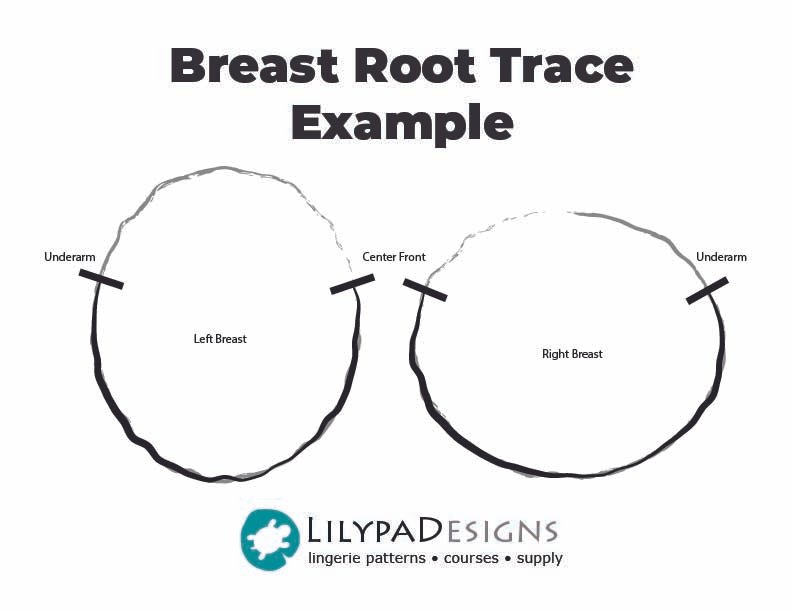
The curve of the flex ruler/wire should follow your IMF as closely as possible. Then quickly transfer to a sheet of paper and trace the inside curve. Repeat the process for the other breast as they may be different. Be sure to label each trace - left or right.

Underwire.png
 
Breast Root Trace_hang.png

Larger and/or Pendulous Breasts and/or Measuring without Help

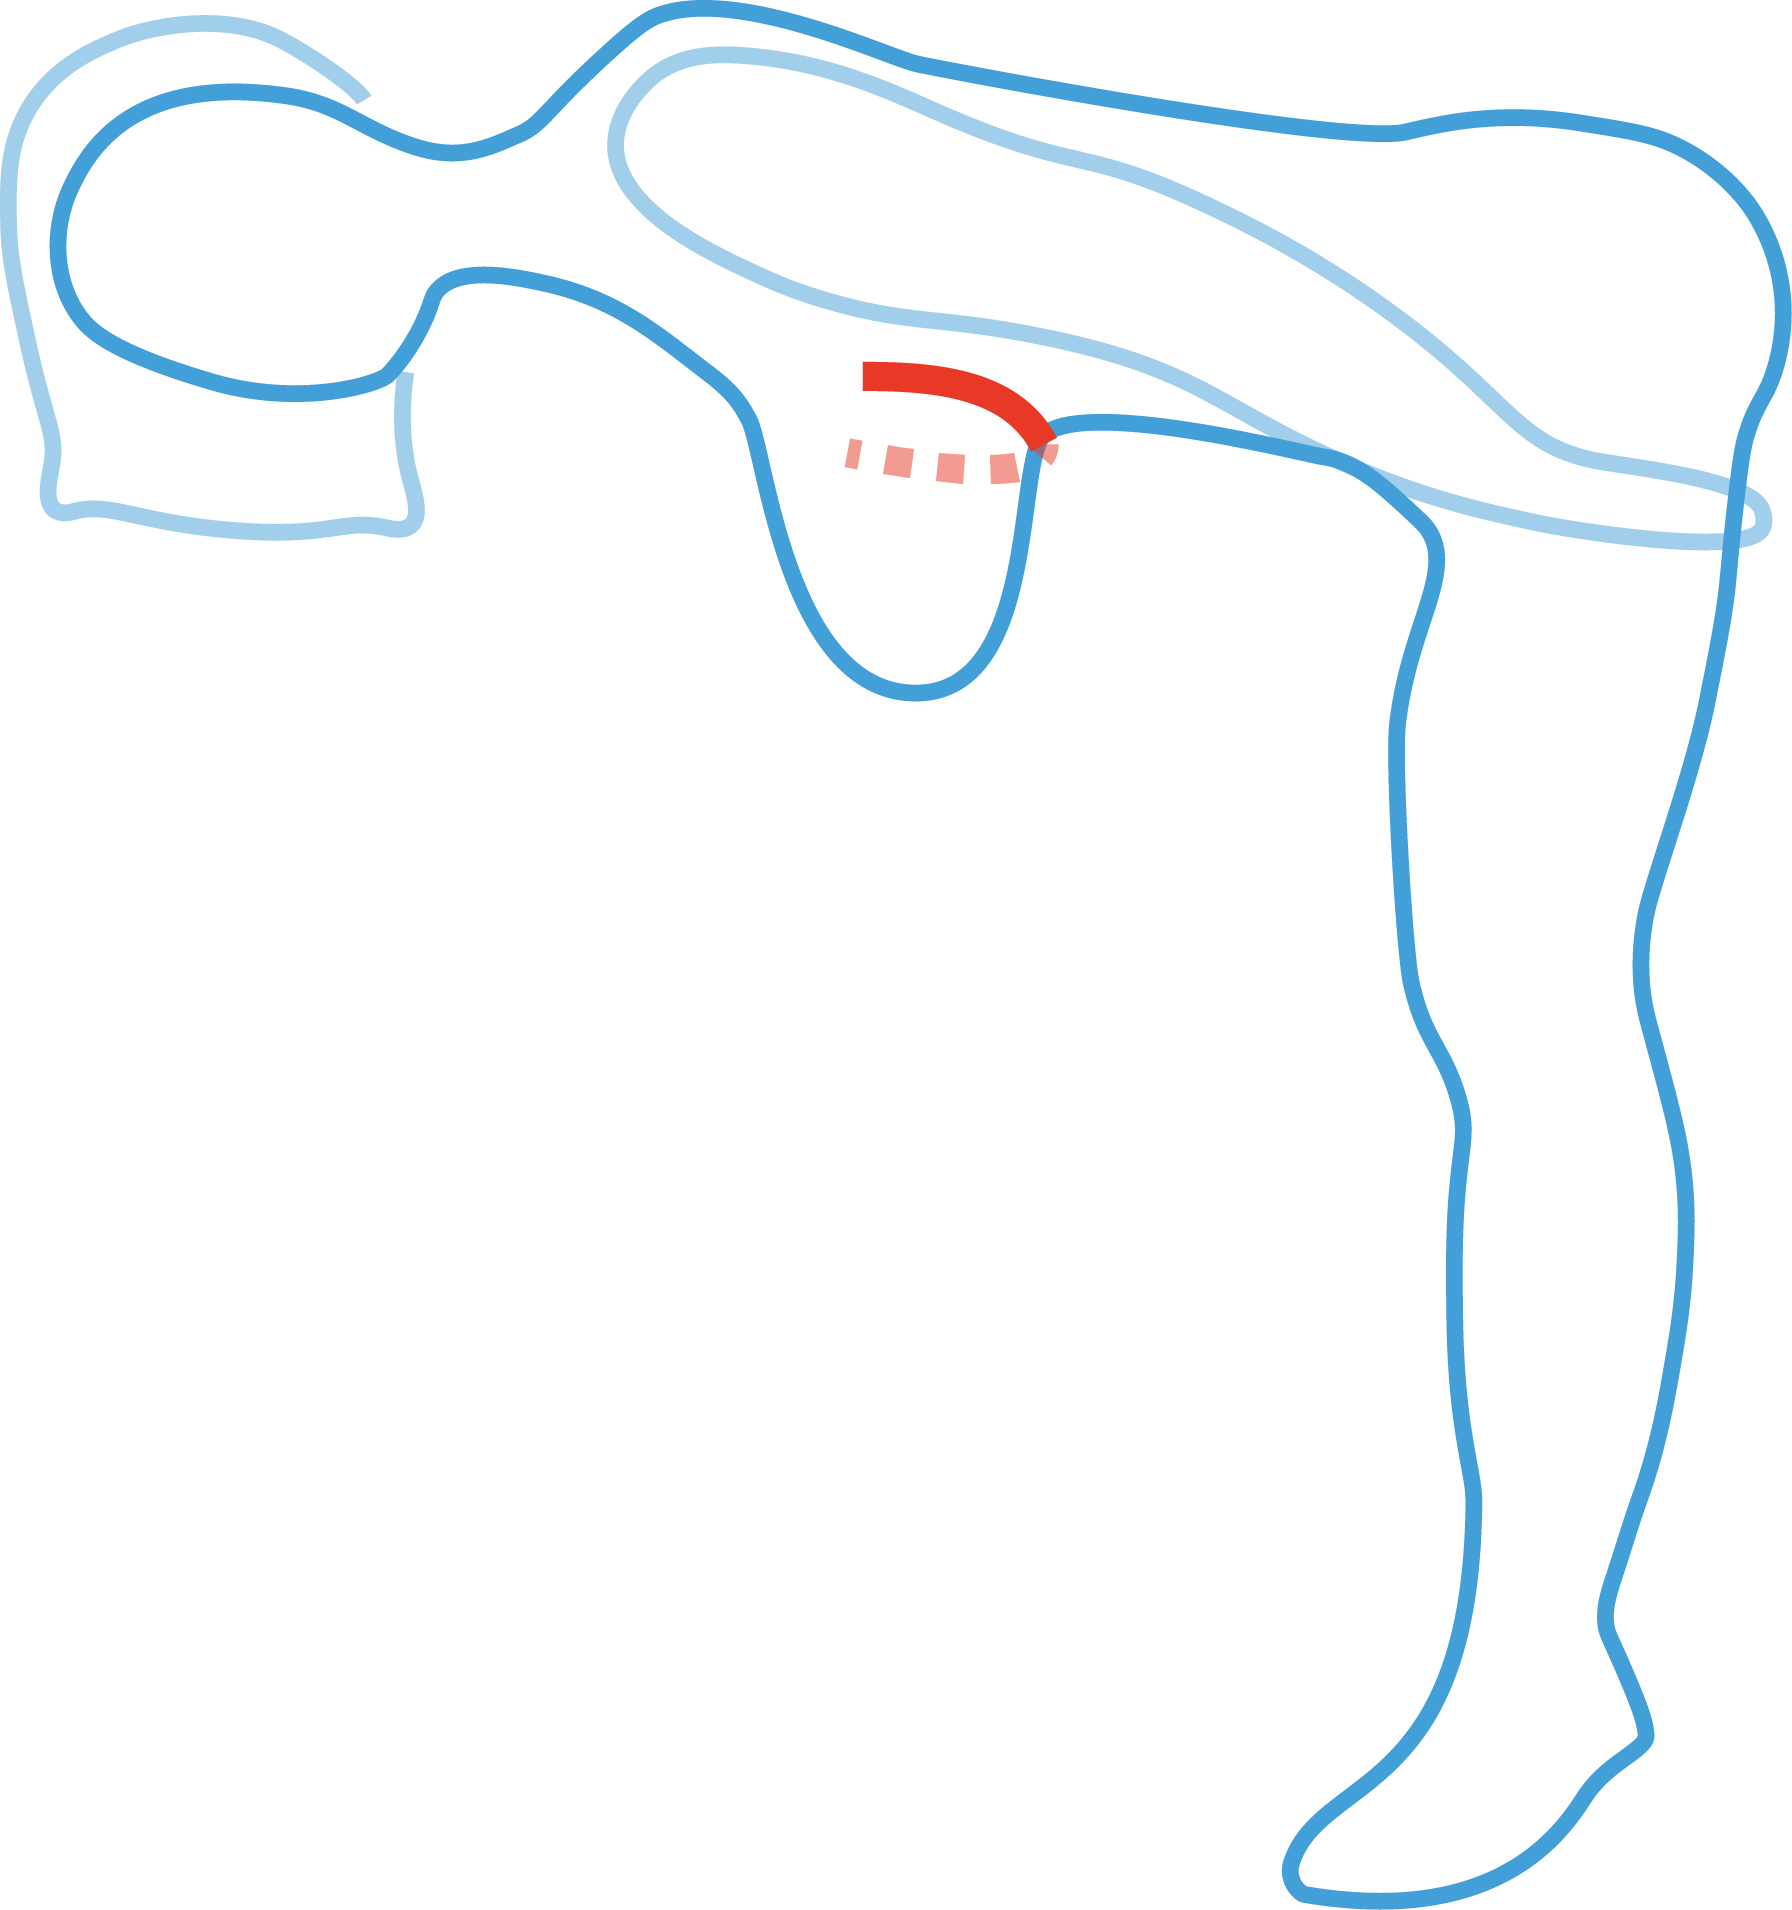
Begin by bending over at the waist and letting the breast hang freely. Take one end of the flex ruler/wire in each hand and press the ruler around the breast crease (Inframammary Fold or IMF) with one side toward the middle of your chest.

The curve of the flex ruler/wire should follow your IMF as closely as possible. Then quickly transfer to a sheet of paper and trace the inside curve. Repeat the process for the other breast as they may be different. Be sure to label each trace - left or right.

If the IMF is not present or hard to find, try pushing the breast mound toward the underarm to temporarily create a crease and mark it with a washable marker. Sometimes palpating the area (with eyes closed and leaning) can help differentiate between tissues - similar to a breast exam. Another option would be to trace the indentation left at the end of the day after wearing your best fitting bra. If you’ve tried all of these methods and are still unsure, the last option is to try a number of different underwire sizes AND styles in a fitting band.


Encourage flex ruler to keep the shape by encircling the breast.

Due to the nature of the flex rulers, the trace may not want to stay in shape for very long. Encourage it to stay by curling the ends in a bit as it will relax slightly once its time to trace. You can go as far as to create a “circular shape” with the ruler before transferring to paper. Just be sure to note which side is the center front and the which is the underarm and approximately where the wire tip would end. This process may take a few attempts. It may help to have the wire charts out to compare shape (ie. Day Wear, Omega, Vertical, Vertical Flat, etc).


I’ve got my Trace, Now What?

Once you have your breast root trace, you can print out the PDF Wire Chart from your favorite vendor and compare. Underwires come in different shapes (ie. Regular, Vertical, Strapless, Plunge and Flat Bottom, etc), Wire Charts also reflect this. If your trace is tall and narrow, take a look at Vertical wires. Short and wide? Regular or Day wire. Flat bottom? Wide Vertical or Flat Bottom wires. Plunge and Strapless wires are purpose based.

Match the general shape first, then match the base curve. A too narrow curve means the wire will either sit on breast tissue or slide down. A too wide curve (an accompanying too wide wire opening) can reduce projection and cause a minimizing effect.


Next, take a look at the wire opening - the distance between the wire ends. Ideally, you’ll want the wire to be slightly (say, 15mm or 5/8”) narrower than the trace itself as most bra patterns (including store bought ones) include something called wire spring. Different types of wires have different amounts of spring (especially, say, heavy duty wires vs flex wires) so its best to have some on hand to test. In general, the thicker the wire, the less spring it will have. Retail manufacturers use between 15 and 55mm of wire spring depending on size and gauge - the larger the size, larger the spring. Some lingerie pattern companies do NOT include wire spring in their patterns, in this case, simply find the wire that best matches your breast root trace.

Once you’ve determined the best wire match, order that size as well as a few adjacent sizes. This is more efficient use of time (and shipping) as the amount of spring for a particular wire may differ based on gauge and composition. The best fitting wire is usually somewhere between the leaning (smallest) and standing (largest) trace but skewed toward the smaller side. Thus prudent to purchase a few wire sizes up when using the leaning trace or add a few sizes down when using the standing trace. Heavy duty wires have less flexibility and may also necessitate going up a size for comfort. For those who are too excited sit around while waiting for the wires to arrive, find the cradle size that best matches your wire/breast root trace. A LilypaDesigns patterns include a Cradle Chart to make finding a matching cradle size a breeze. Once the cradle size is determined, a quick and dirty “test fit” can be done with paper. Print/trace your cradle pattern pieces (center gore, side cradle and back wing) on cardstock, remove seam allowances and duct tape together then hold against the body. This will allow you to check not only the wireline but the torso shape/rib cage fit.

 
Breast Root Trace Spectrum - Wired
 

For wireless bras with a full frame and a “wireline” like the Lanai, Kwik Sew K3594, and Queen Elite, simply lay your trace on top of the cradle size chart and find the best match.

*Bonus: Why Measure Leaning/Bending?

Viscous breasts are affected by gravity in a way that is different than someone who is self supporting. The breast tissue not only pulled downward but also spreads from the weight, creating a wider breast root. A too wide wire can jab you in the arm AND have a minimizer bra effect.

Taking a breast root trace while leaning has a few advantages for those with large breasts and/or soft tissue.

  • Allows use of both hands

  • Approximates the lift that an underwired bra would ideally provide.

  • Reveals the shape of the breast crease unencumbered by gravity.

Bra Fitting Band

I've mentioned the benefits of a bra fitting band a few times before but thought it was time for me to write a tutorial on how to create one!

What is a Bra Fitting Band?

Quite simply, a bra fitting band is a underwired bra without cups!  It allows one to see the fit of the band and most importantly the center gore unencumbered by the cups.  It can help you determine a well fitting underwire (or confirm it) as well as see common bridge issues such as center gore too wide on top and/or too narrow on the bottom. In some cases, it can also help diagnose torso based fitting issues such as pectus carinatum or flared ribs. A fitting band ALSO makes the process of fitting the bra cups easier as you can just baste on a tester cup without having to make an entire bra.  It also speeds up fitting using the process of elimination. (ie.  I know the wrinkling is not caused by the band/wires, etc so it has to the cups).

****Flexwires DO NOT WORK in Fitting Bands****

fitting_band.jpg

For those with Omega shaped breasts [see breast anatomy primer HERE], I HIGHLY recommend making a fitting band as it may take a few tries to get the right sized cups then to get the cups to fit the band. Makes the fitting process easier and dare I say, less headache.

Fitting Band.png

Materials Needed

Materials required for a fitting band is the same as a regular underwired bra - namely:

  • Bra pattern

  • Underwire (any type except flex wires)

  • Fabric for cups and cradle w/ same stretch % as indicated on pattern

  • Powernet or Techsheen w/ same stretch % as indicated on pattern

  • Hook and eye

  • Plush elastics (top and bottom band) w/ same stretch % as indicated on pattern

  • Strap elastic

Step 1. Cut out fabrics as usual (with exception of cups)

Step 2. Sew cradle and band pieces together.

Step 3. Sew on plush elastic (top and bottom).

Step 4. Sew on underwire channeling 1/4" (~6mm) away from edge.  There are a few ways to do this - you can baste (by hand or machine) 1/4" away from edge or use a fabric marker/pencil/chacoliner to draw the seam allowance on the fabric.  This give you something to line up the edge of your channeling against when sewing.  Keep the ends of the channeling open so you can slide the wires in/out.  One less thing to worry about when basting on cups.

Step 5. Sew the second pass of the channeling on the opposite edge in the same manner.

Step 6. Insert wire of choice and try it on!

OPTIONAL

  • Keep the ends of the channeling long so you can accommodate different length wires.

  • Sew the wire channeling to the outside of the frame.  Easier access and possible to swap out wires without removing the bra.

  • Sew a G-Hook to the channeling so you can hook your strap to the bra without tester cups.

  • Step 5: Sew on strap and hook & eye. Leave the front ends of the straps hanging - this allows you to pin the straps to any tester cups you may want to baste on.


BONUS

One additional reason I love a good fitting band is the ability to quickly baste on tester cups. A well perfectly fitting, err, fitting band allows you try out different cup alterations without sewing up an entire bra. Combine this with some wash-away-thread and its possible to try out 4-5 different cups in one afternoon!

Fitting_Band_easy.png

Fitting Band - Alternate Method

I also want to mention a faster and easier way of creating a fitting band using an old bra.  For those of us who have been on our me-made bra (or for a lucky few, RTW bras) making journey for a while, we may have bras we completed and fit well in the bridge/band but not in the cups.  You can simply cut off the cups approximately 1/2" (1.2 cm) above the wireline.  All that is left is to open the underwire channeling (so you can remove the wires while basting on tester cups). 

Giving credit where credit is due.

I first came across the idea of a fitting band from Merckwaerdigh HERE.

 Measuring Sling

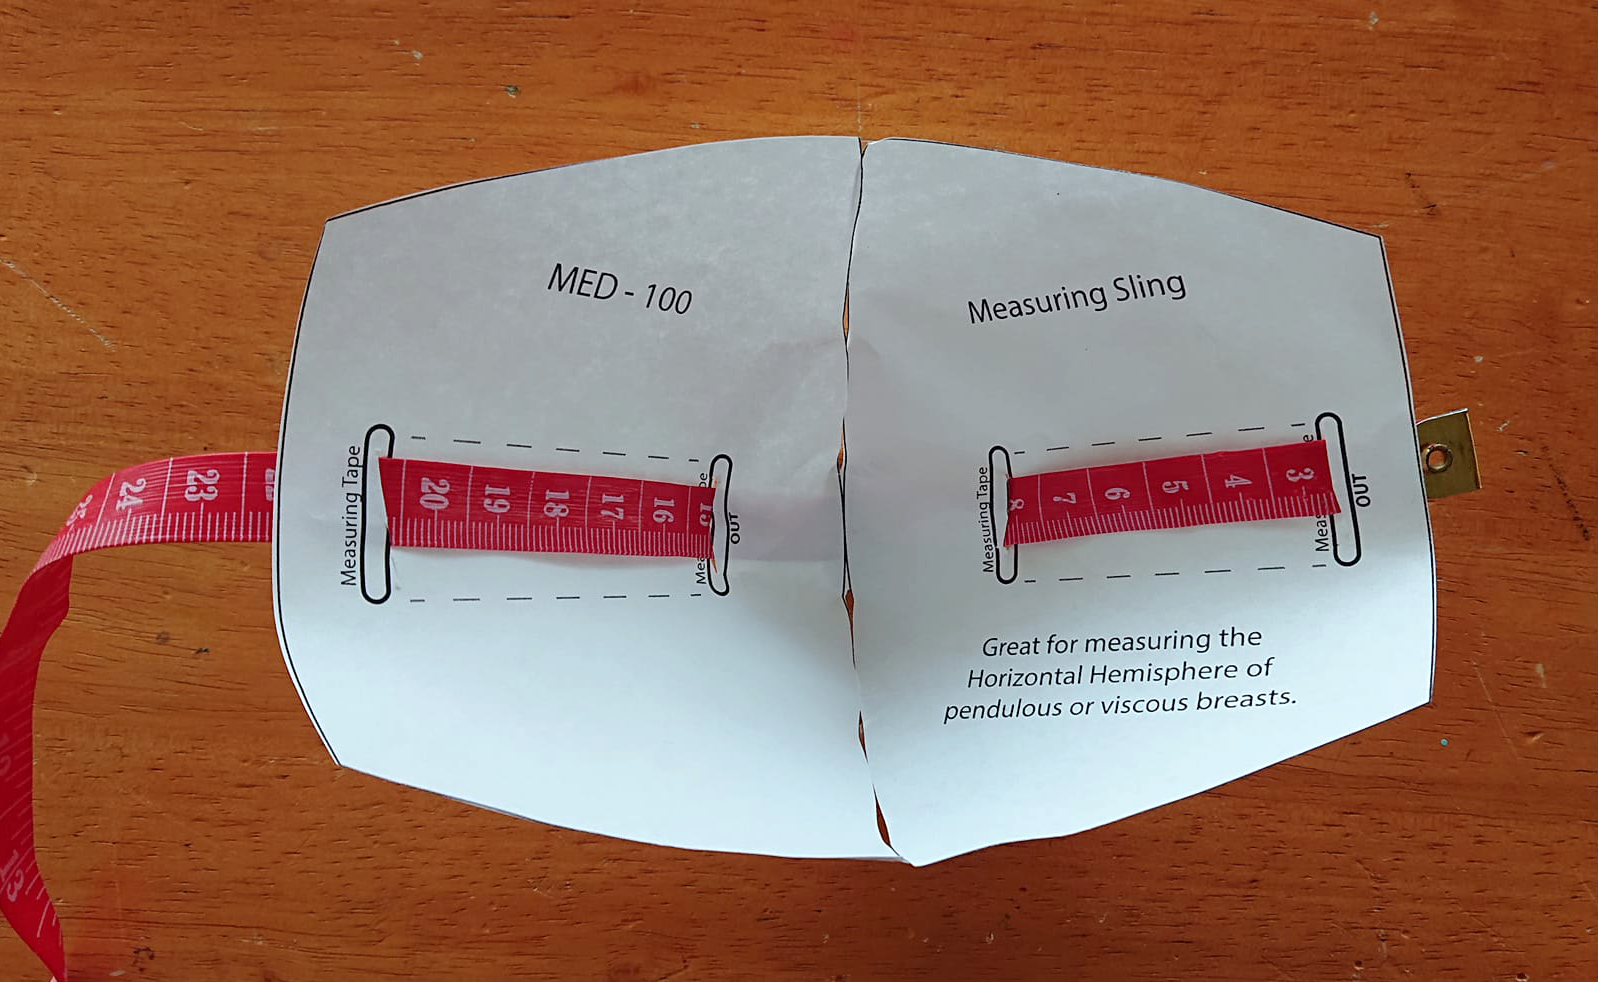
The Measuring Sling is a FREE tool to help find the Horizontal Hemisphere of Pendulous or Viscous breasts while leaning over. See Measuring Guide for full Instructions.

This template was JUST created and haven't had a chance to test it. Let me know if this works better for you!

The sling comes in 2 different sizes. These do NOT have to match your breast, its intended to LIMIT the gravity pull when measuring the HH while leaning.

Download [HERE]

*Bonus: Why Measure Leaning/Bending?

Viscous breasts are affected by gravity in a way that is different than someone who is self supporting. The breast tissue not only pulled downward but also spreads from the weight, creating a wider breast root and possibly increased horizontal measurement. We created the Measuring Sling to help combat this. Simply use the sling and tape combo to “pull the breast back” a bit while measuring.

Taking the horizontal measurement while leaning has a few advantages for those with large breasts and/or soft tissue.

  • Allows use of both hands (no assistant needed)

  • Approximates the lift and shape that an underwired bra would ideally provide.

  • Reveals the shape of the breast crease unencumbered by gravity.

 Narrow Root & Omega Adjustments

What is an Omega Shaped breast?

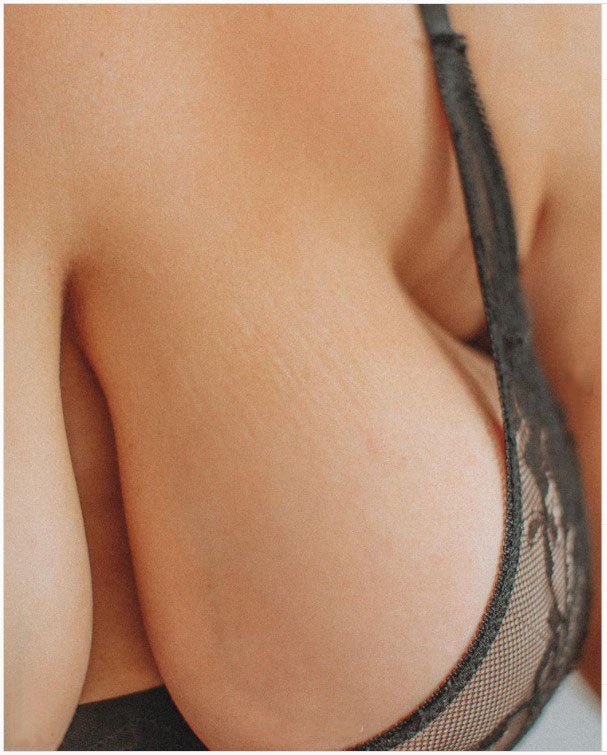
An Omega Shaped Breast is a breast whose width is WIDER than the breast root. [For a primer on breast terminology, click HERE] From a top down view, the breast is often rounded near the bust point and tapers in toward the chest wall. This is more apparent while leaning over.

A subset of the Projected Breasts may also have narrow roots. The breast root is narrower than expected for the volume (and band size) similar to omegas, but lacks the bulbous shape. From a top down view, the breast is more tubular/torpedo shape - also more apparent when leaning over.


In retail bras, common fit issues for both include either correct cup volume with too wide wires and shallow cups. Or wires that fit well but the cup volume is too small. Breasts may be compressed against the body with skin-on-skin inside the cup. The wire may also be sitting below the inframammary crease.

One can have an Omega Shaped breast of varying degrees. If the breast root is smaller than the breast volume by 1-2 sizes, then one is likely to be projected + narrow roots. If the root is 3-5 sizes smaller, one may be omega. Extreme omega is where the breast root and breast volume differ by 6 or more sizes. One can also have omega shaped breast AND be inner full. [Additional info on Inner Fullness HERE].

Omega Shaped Breast

Photo used with permission by M Brand Photography.


What is an Narrow Root (Omega) Adjustment?

Due to the differences between cup volume and underwire size, mixing and matching the size that best matches the body part will lead to seam lengths NOT matching up. In this case, there may be a few centimeter or several inch in difference between the wireline of the cups to the wireline of the cradle to adjust for. [How to select size HERE}

Labellum_omega_wireline.png

Example of two bras with same cup volume on the same body but different underwire size/shapes.

There are 2 common methods to for fitting a larger cup into a smaller cradle: gathering/pleating or adding darts. Depending on your situation, one maybe preferable to the other. Gathering/pleating can be useful during the muslin stage where speed is key and neatness, less so. Incorporating darts into the seamlines is ideal for larger size differences and a cleaner finished look.

How Do I Make an Narrow Root Adjustment?

If you making BOTH the BCD and Omega adjustments, you can do all of this in one swoop. This is fairly straightforward when using Adobe Reader. Just turn on the 2 sizes you need (and turn OFF the Seam Allowance) then draw a new curved line that reduces the height (BCD) while maintaining the width (HH). [Full Instructions for Altering the BCD HERE].

Labellum_BCD_mod.png
Labellum_BCD_mod2.png
Labellum_BCD_mod3.png

Then add darts to the wireline to reduce the total length. If you made a muslin, you can measure the difference between the cup and the cradle. If you haven’t made a muslin, you can measure the length of the wireline of the cup compare it to the wireline of the cup. The difference is what you need to remove via incorporated darts. Note that in my patterns, the vertical seam of the lower cup needs to match up with the vertical seam of the cradle.

This omega alteration method can be applied to any number of bra patterns using the formula:

difference (between wireline lengths) / #of seams.

All that is left is to “walk” the altered seamlines to make sure they all match up and add the seam allowance back on!

Labellum_BCD_mod4.png
Labellum_BCD_mod5.png
Labellum_BCD_mod6.png

Adjustments for Extreme Omega Shape

EXTREME omega - major differences (in excess of 6 sizes) between the breast volume/horizontal hemisphere and the wire size may need additional alterations.

EXTREME omega - major differences (in excess of 6 sizes) between the breast volume/horizontal hemisphere and the wire size may need additional alterations.

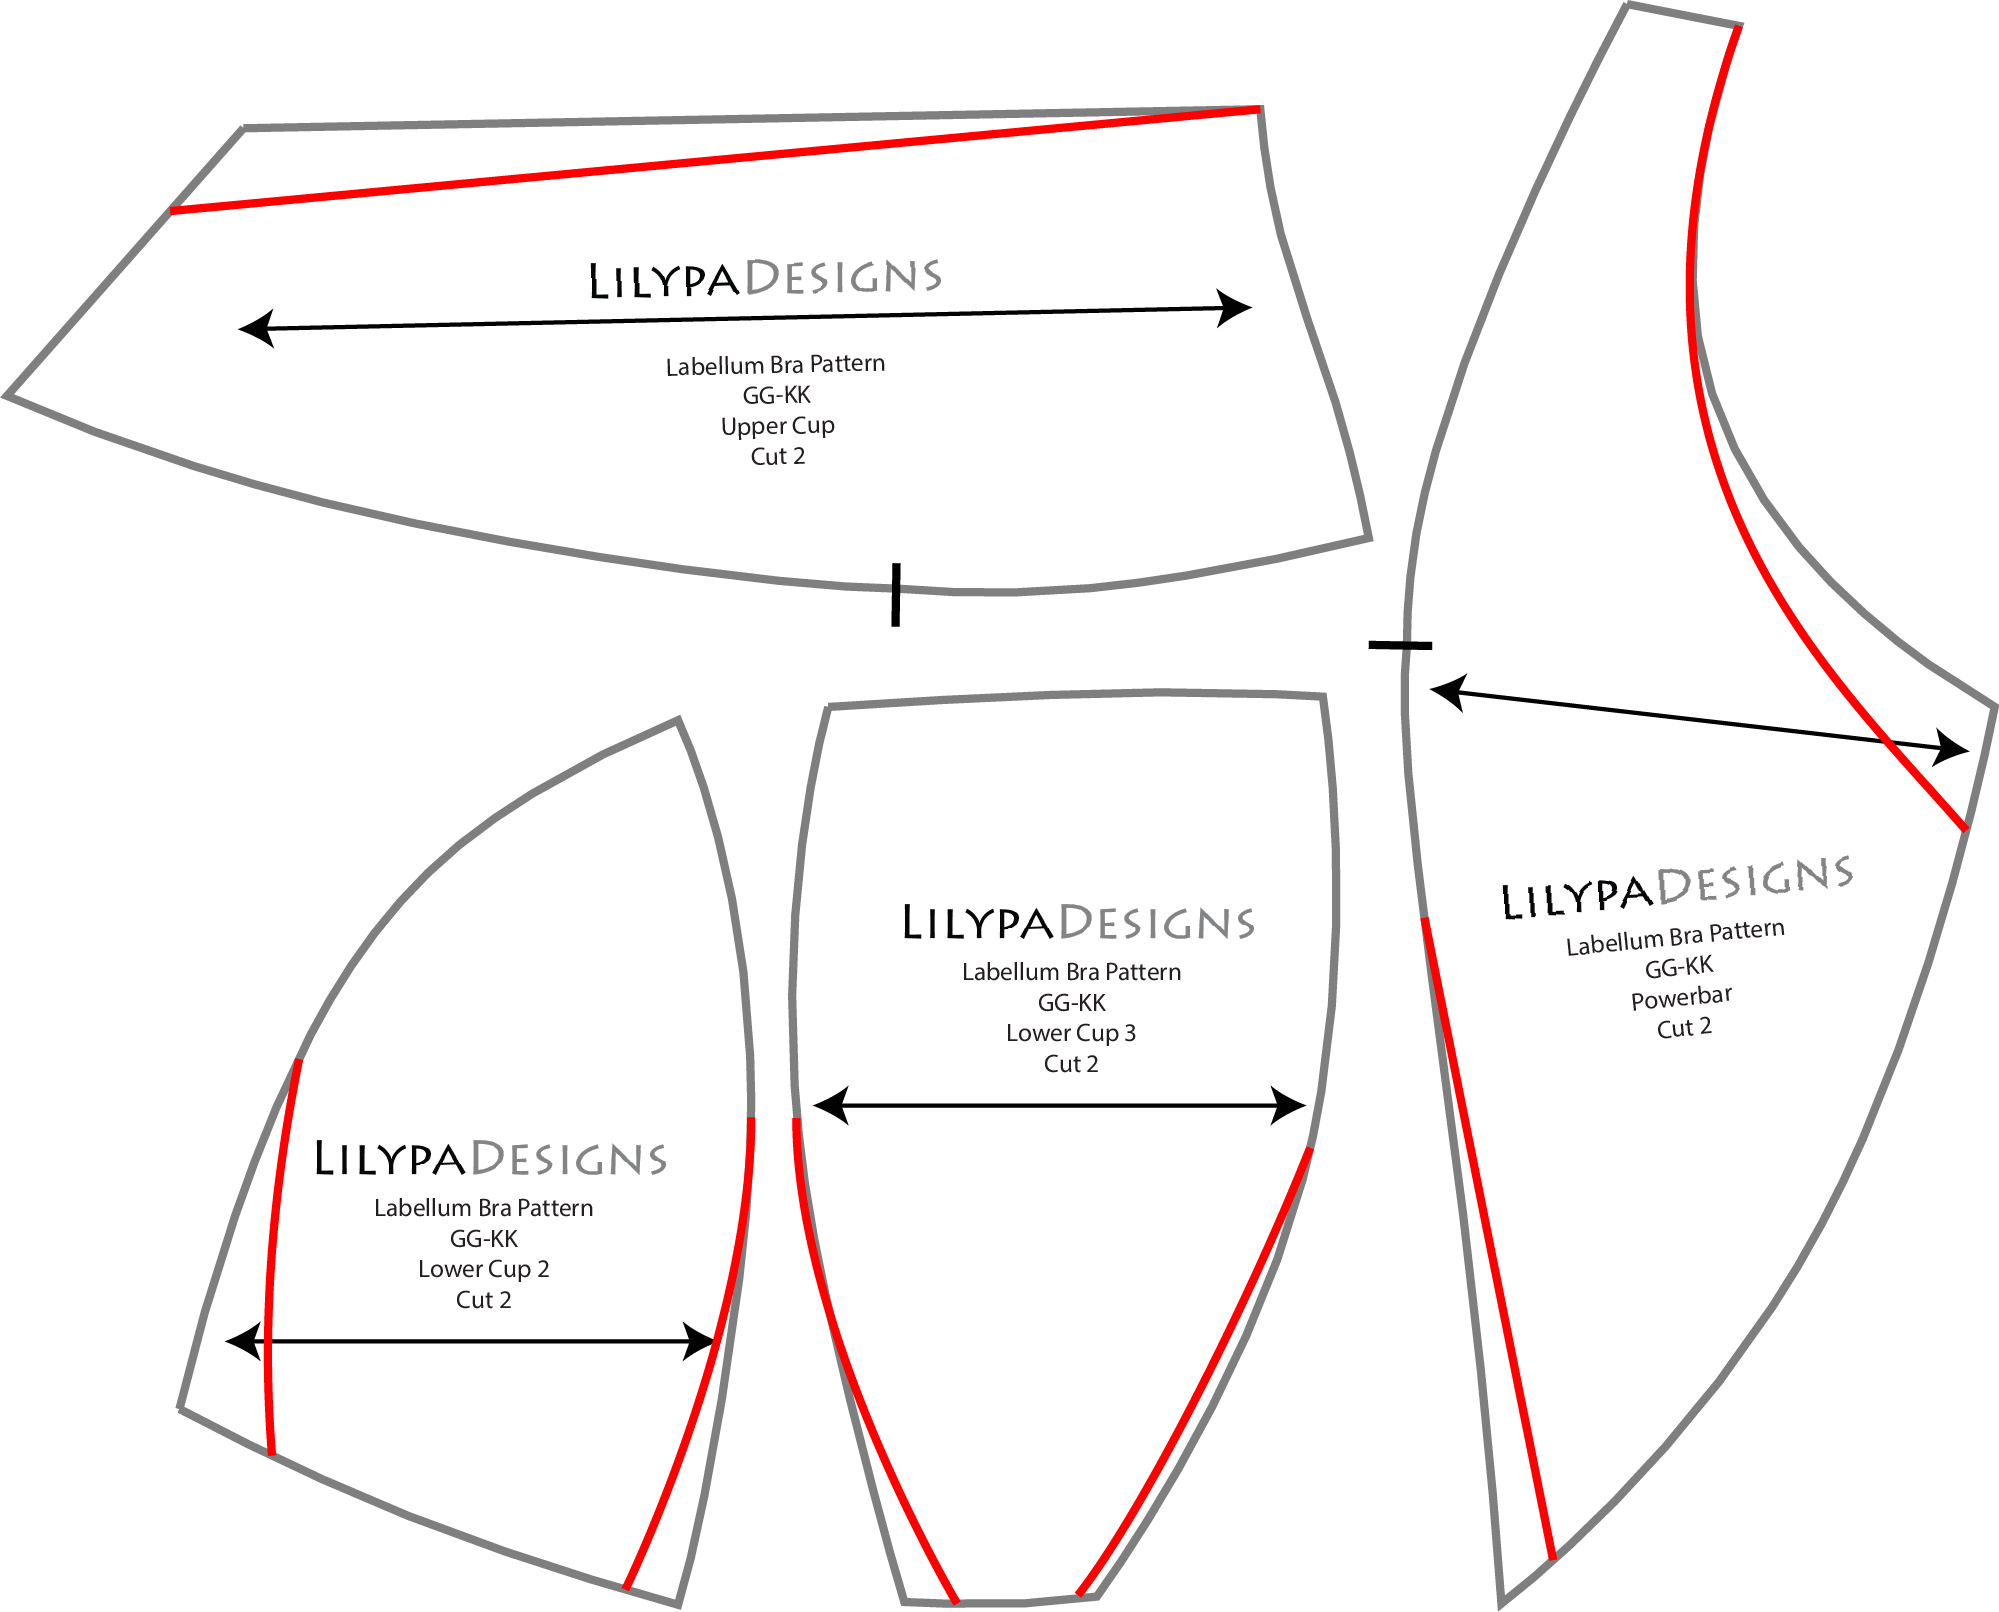
If you are VERY omega shaped (6 or more size difference), you may also need to take some length out of the wireline from the neckline of the upper cup AND the powerbar as well as extending the length of the darts themselves.

In the case of an extreme omega, incorporated darts is the ONLY method recommended due to the major differences in wireline lengths of the cup vs the cradle.

EXTREME omega - major differences (in excess of 6 sizes) between the breast volume/horizontal hemisphere and the wire size may need additional alterations.

Note that the incorporated darts are longer - at least half the distance of the seam itself in the lower cups and the full length in the neckline and underarm sections.

Also note that the HH seam of the upper cup is left untouched. Too much curve at this line can create odd bulges.

Removing length from the wireline of the upper cup will also lengthen the neckline. You may need to add a dart (slash and hinge at bust point) to compensate.

This omega alteration method can be applied to any number of bra patterns using the formula:


Difference (between wireline lengths) / # of seams.

As usual, true the lines before adding seam allowance back on.

This basic narrow root/omega adjustment will get the cup to match your measurements but may not match shape-wise (aka Volume distribution).

If you have lots of inner fullness (cleavage without pads, symmastia, breast has square-ish top down view, etc) additional adjustments may also be needed. We HIGHLY recommend making paper cups to check shape, projection and inner fullness before moving on to fabric. Checkout out Inner Fullness Adjustment HERE.

 Bra Support Systems - Wired vs. Wireless

Did you know the support system that makes an underwired or wire-free bra "work" are different? At its most basic level, underwired bras are based on the cantilever system while wireless bras are based on the suspension system. Lets take a look at each of these support systems and how they are applied to bras and breasts.

Underwire bras are based an a cantilever support system. What is cantilever support?

“A cantilever is a rigid structural element that extends horizontally and is supported at only one end”

The rigid structural element is the underwire which when attached a firm band acts like the board - the Fixed End [A]. Since most humans cannot tolerate things being bolted to our bodies, we can achieve the same result by creating a band that wraps around the torso. This technique can be seen in road signs as well as free-standing umbrellas.

A loose band is the equivalent of a wobbly fixed end of an otherwise fine umbrella. This makes the umbrella appear to hang lower and droop in a less conventional way.


Wireless bras are based on a suspension support system. What is suspension based support?

“Used to describe a structure supported from higher points, such as a bridge suspended from piers or a building or floors hung from a separate structure“

The building is the breast and strap supports the breast from above.


Within the wireless bra world, there are varying levels of support due to architecture and material use - much like a building. A wireless bra (a distinction from a stretchy bralette) CAN provide the same amount of support as a underwired bra (think vintage bras). There are some trade offs - such as a different shape and silhouette + often taller necklines but the key to a supportive wireless bra is having a “full frame”. Its easiest to image the “frame” as the 3 sides of a triangle {see suspension illustration].

Bra Maker’s Fit Challenges

Do you still have fit problems after following bra fit advice from online bra making groups? Take a look at our Illustrated Fit Issues below to help you diagnose some less commonly discussed bra fit challenges. These fit corrections can be harder to spot and fix. This is not a comprehensive list and only meant as a visual guide to spark conversation. A number of these are covered in our Online Courses and can help you achieve a better fitting bra.

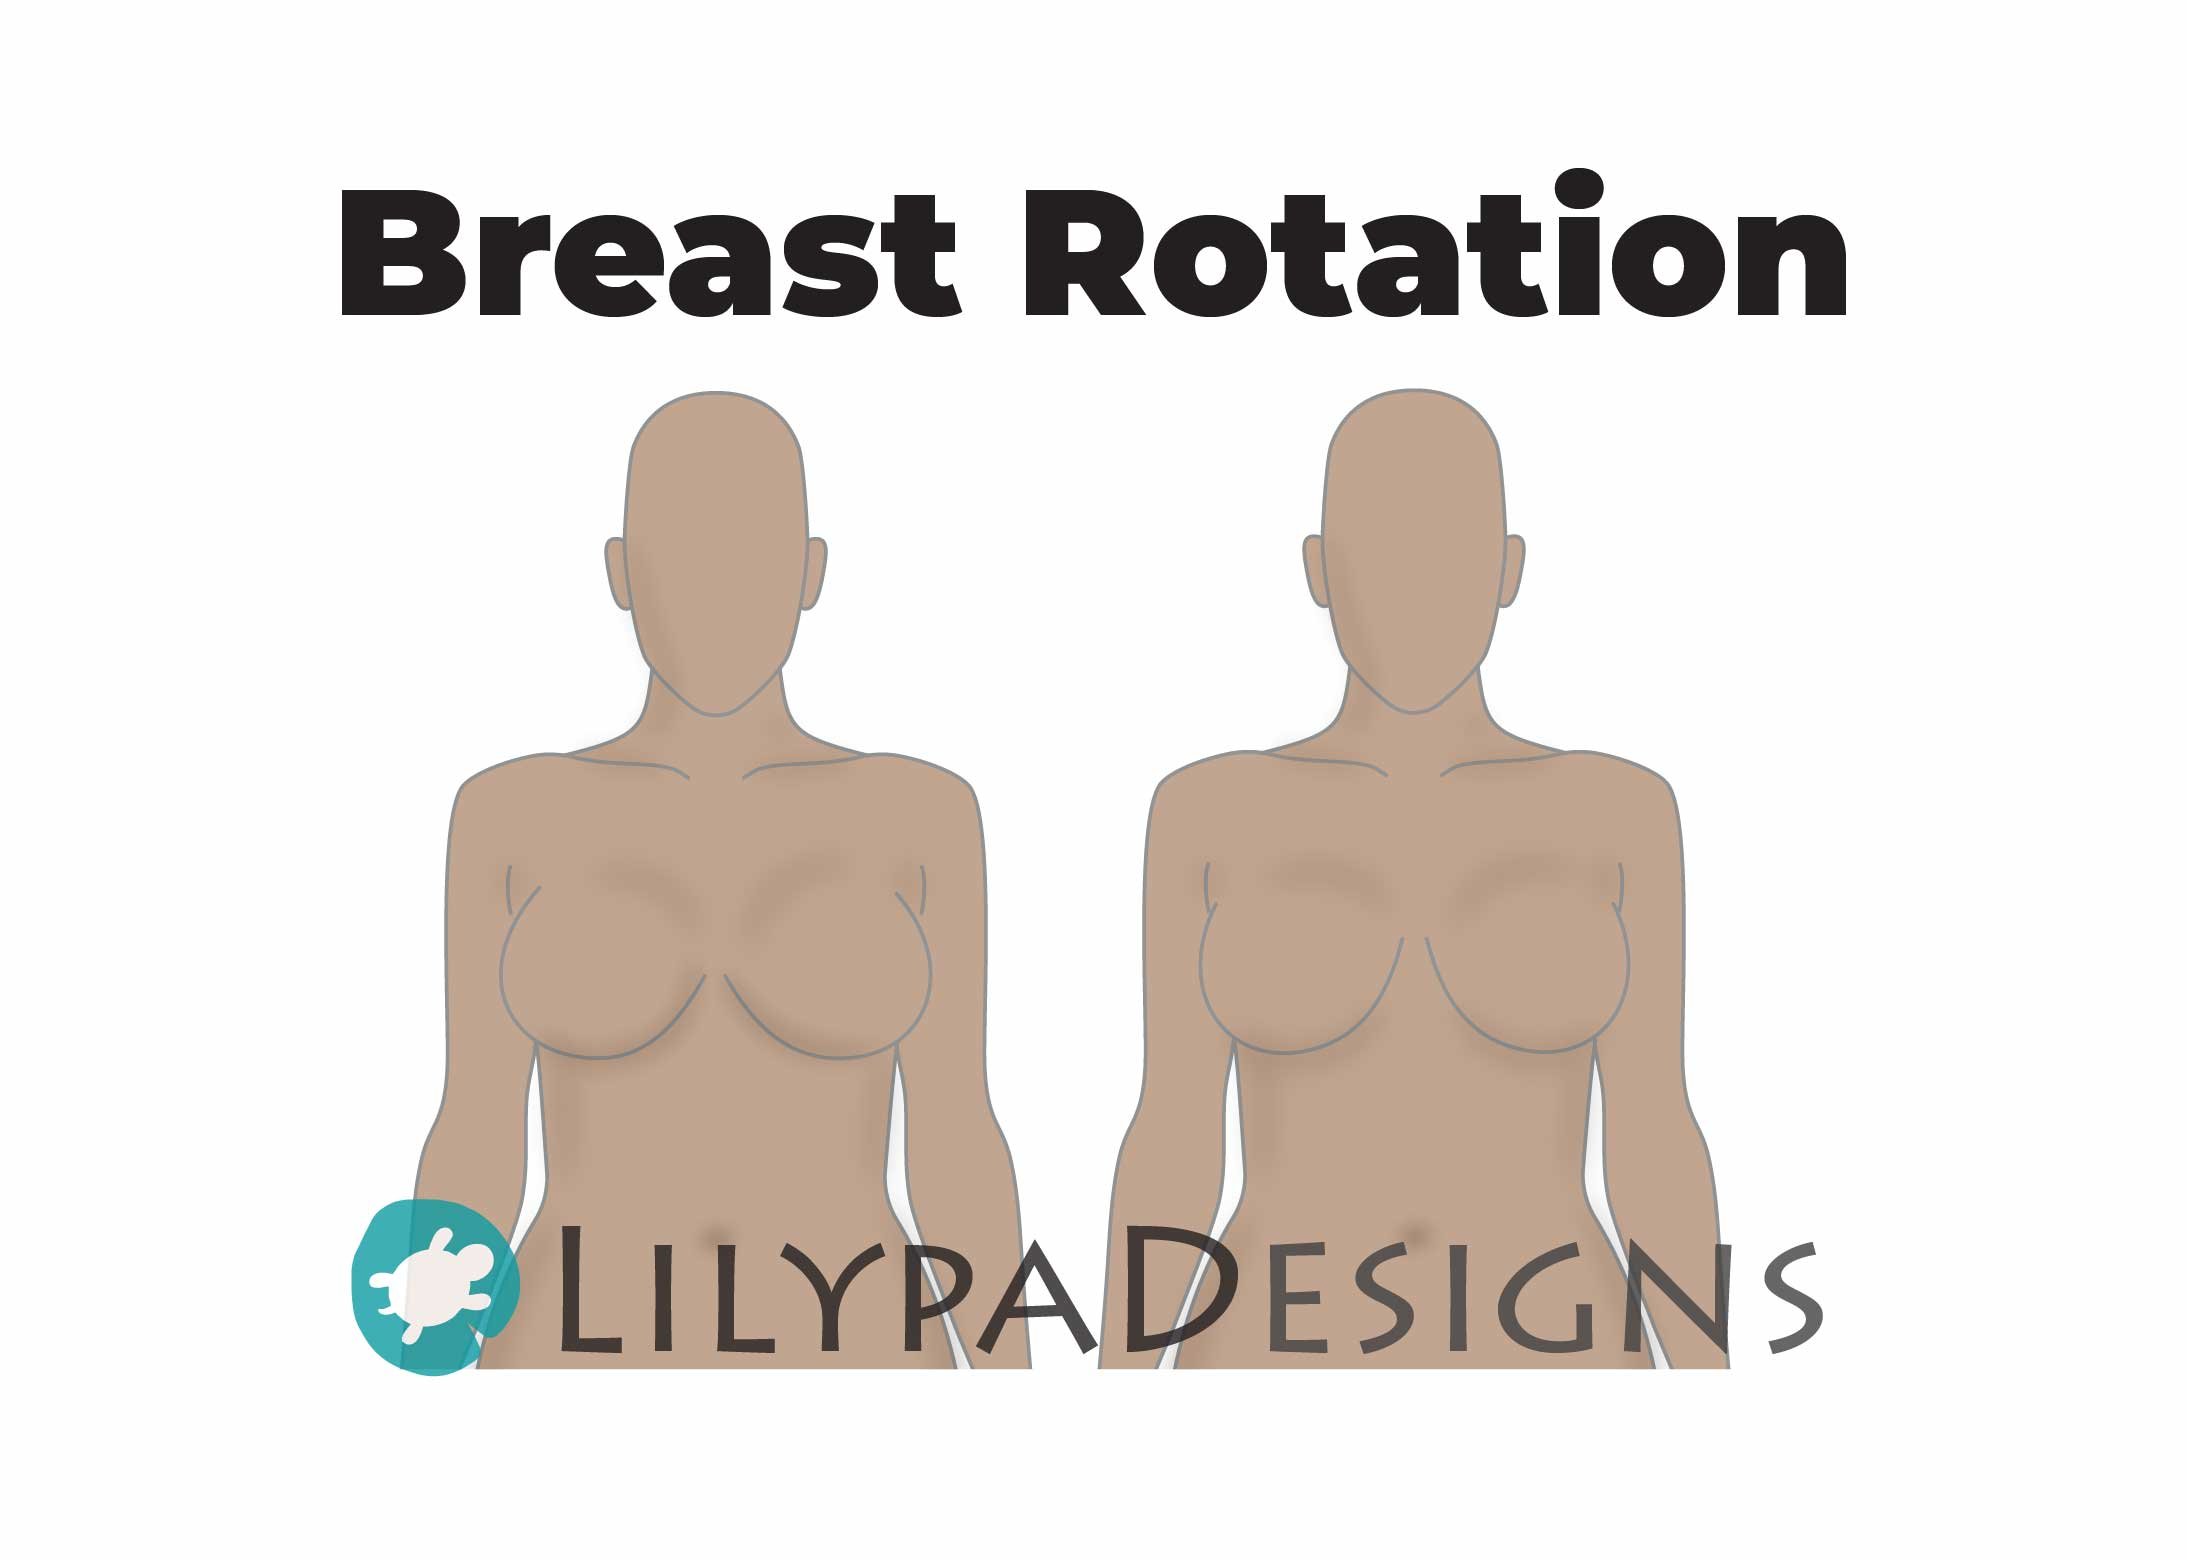
Breast Rotation

Inframammary Fold (IMF) AKA Breast Crease is rotated in a way so that the center gore shape remains the same but shorter at the front and taller at the underarm. Affects shape of the breast and how a bra sits when worn on the body.


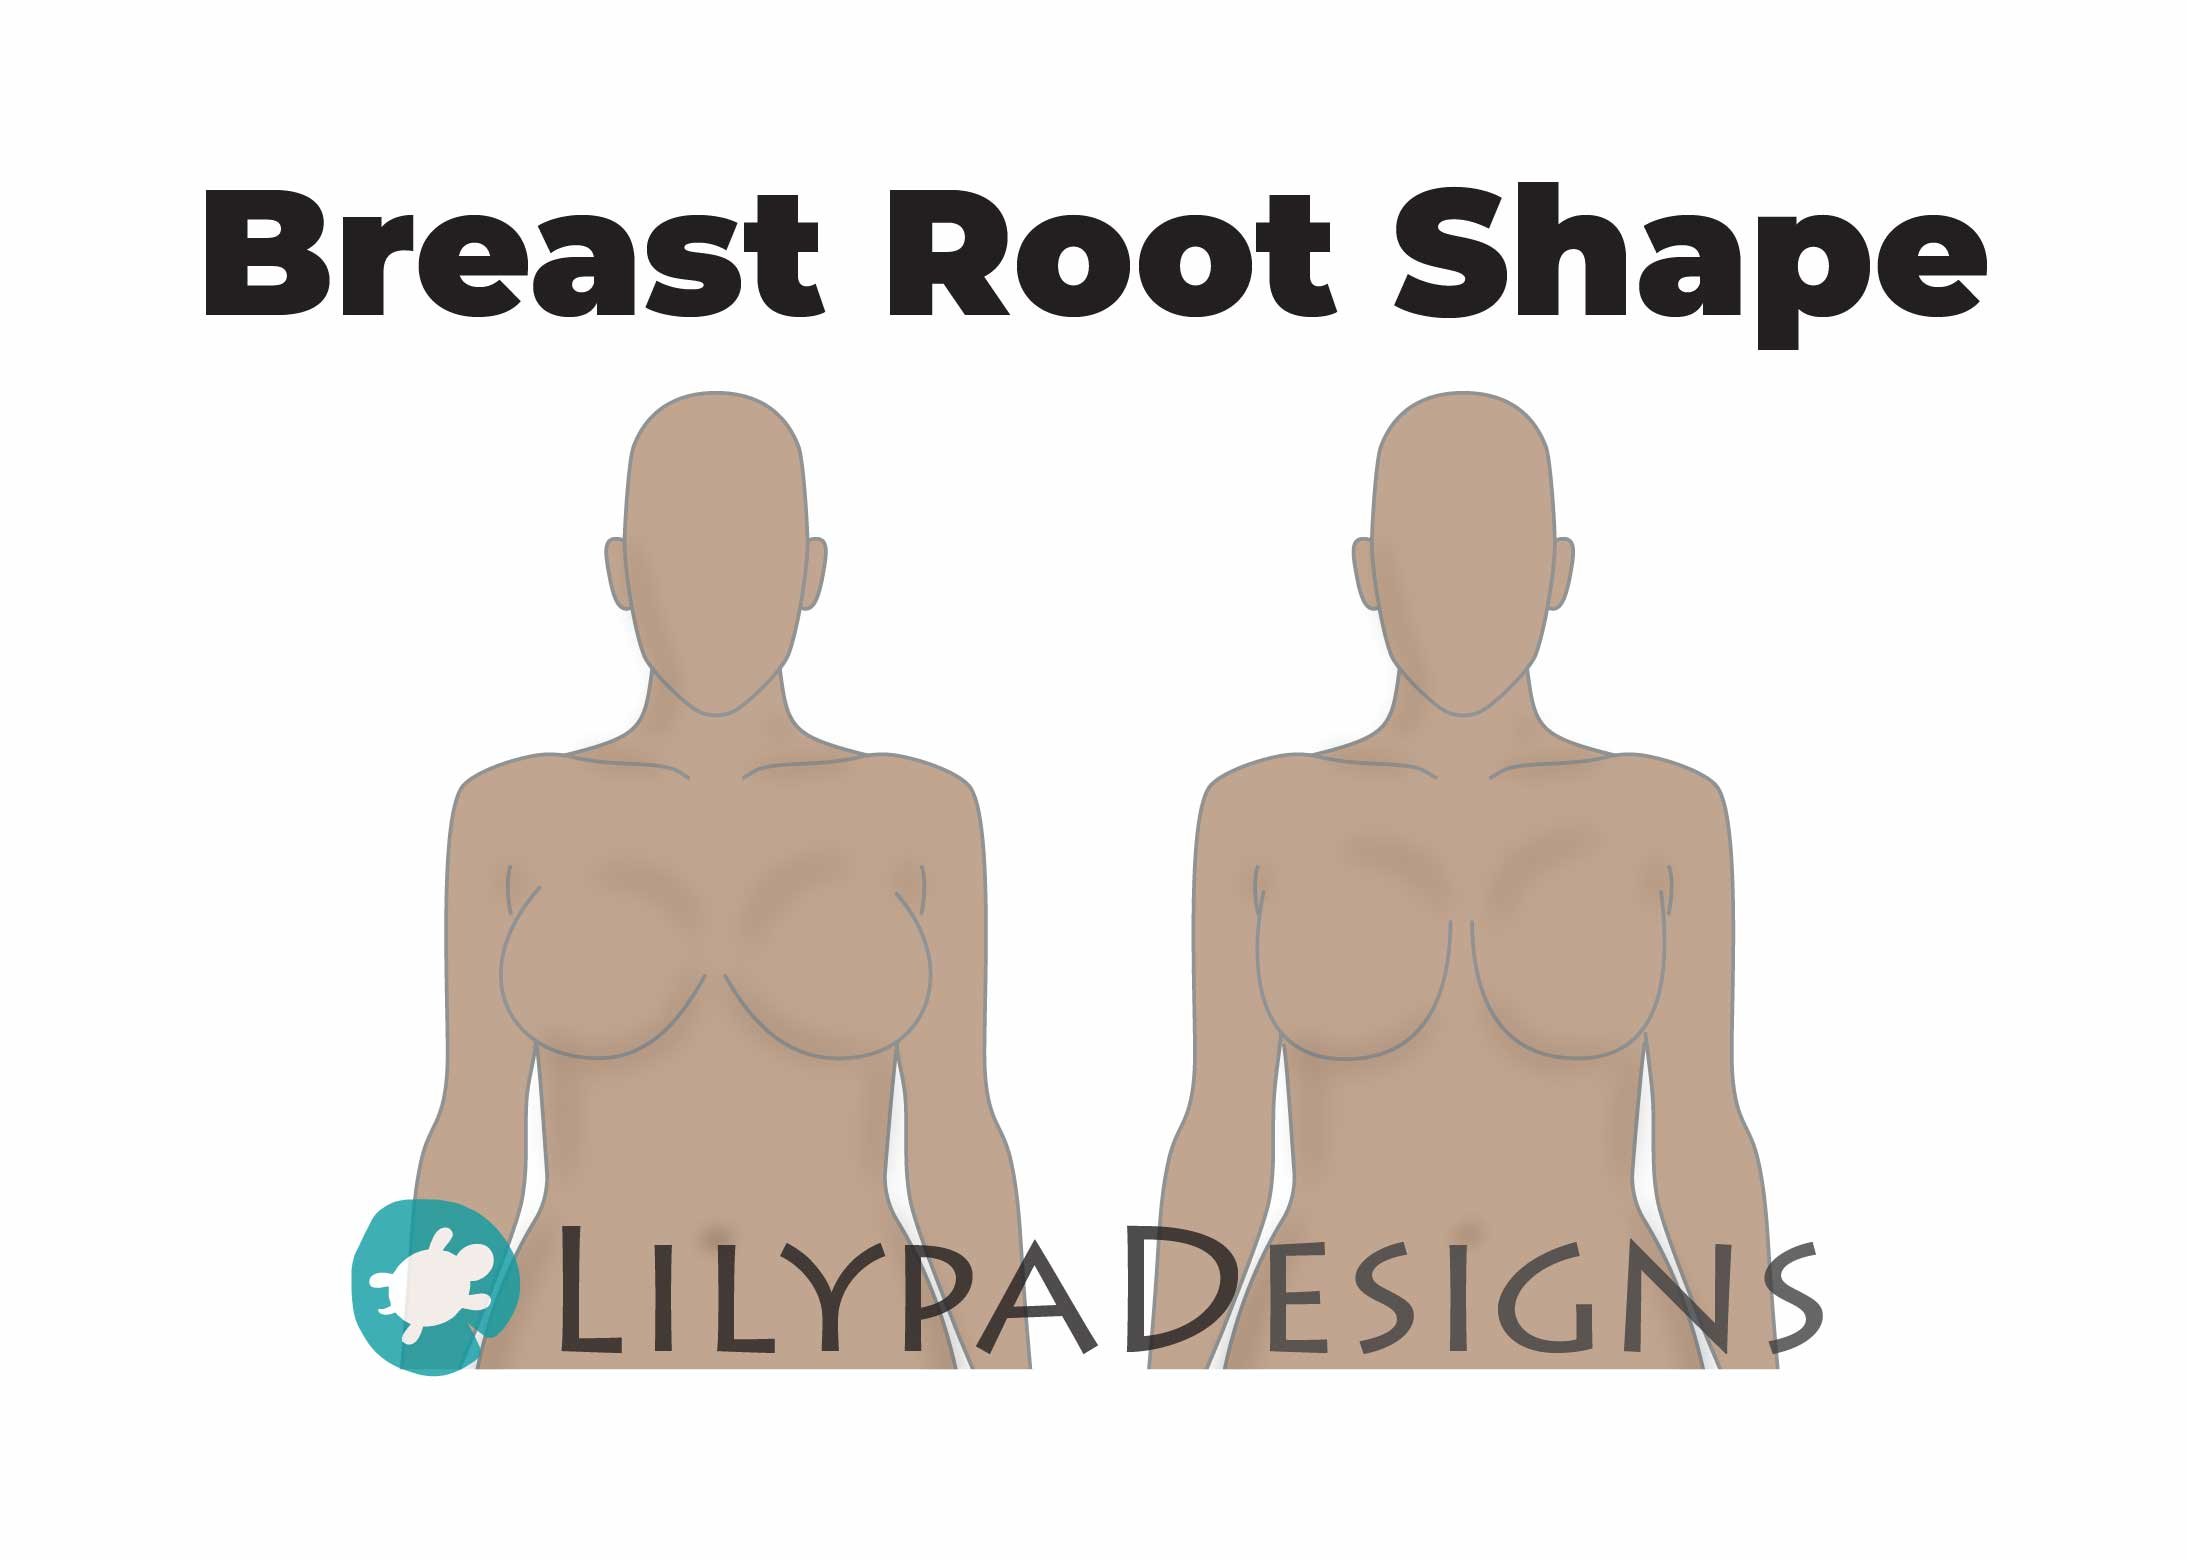
Breast Root Shape

Inframammary Fold (IMF) AKA Breast Crease varies from person to person where two people of the same bra size may have very different breast root shapes. This is a directly related to breast root height and center gore shape.


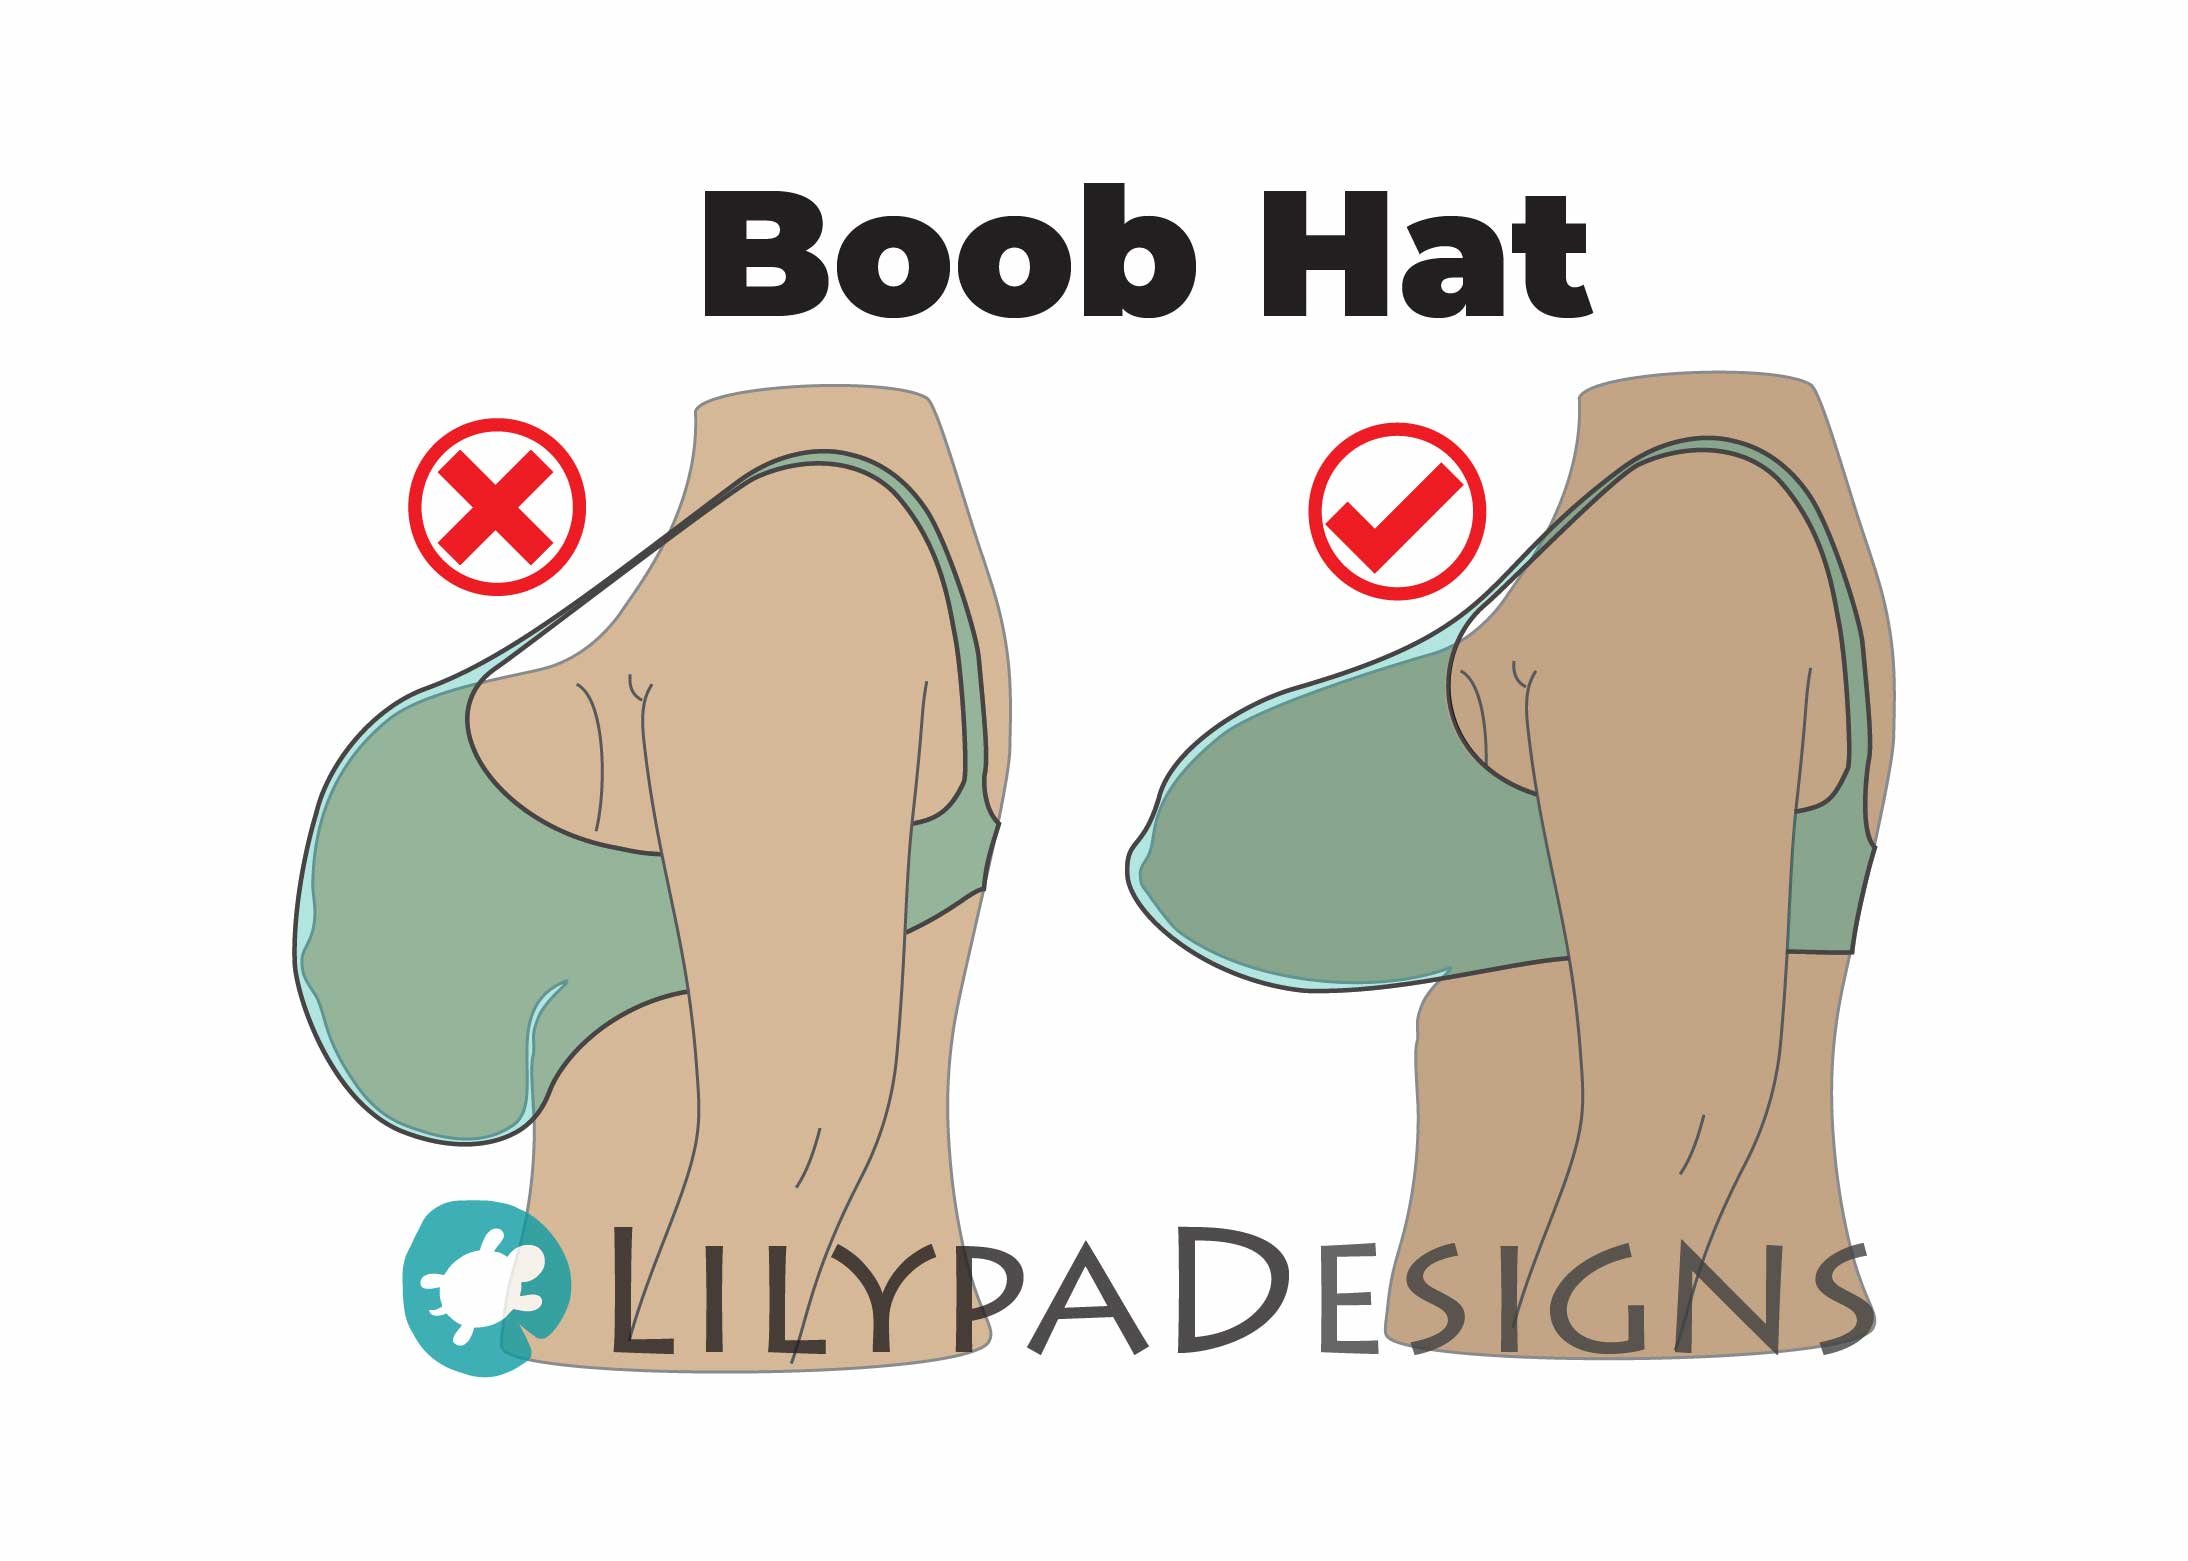
Boob Hat

Cup volume may match breast volume but lacks projection and compresses the breast tissue. Can cause East/West facing breasts and/or mounding at the neckline and/or underarm curve.

Course(s): Projected Fit Issues, Inner Fullness Fit Issues

*Recommended Courses may vary depending on pattern used


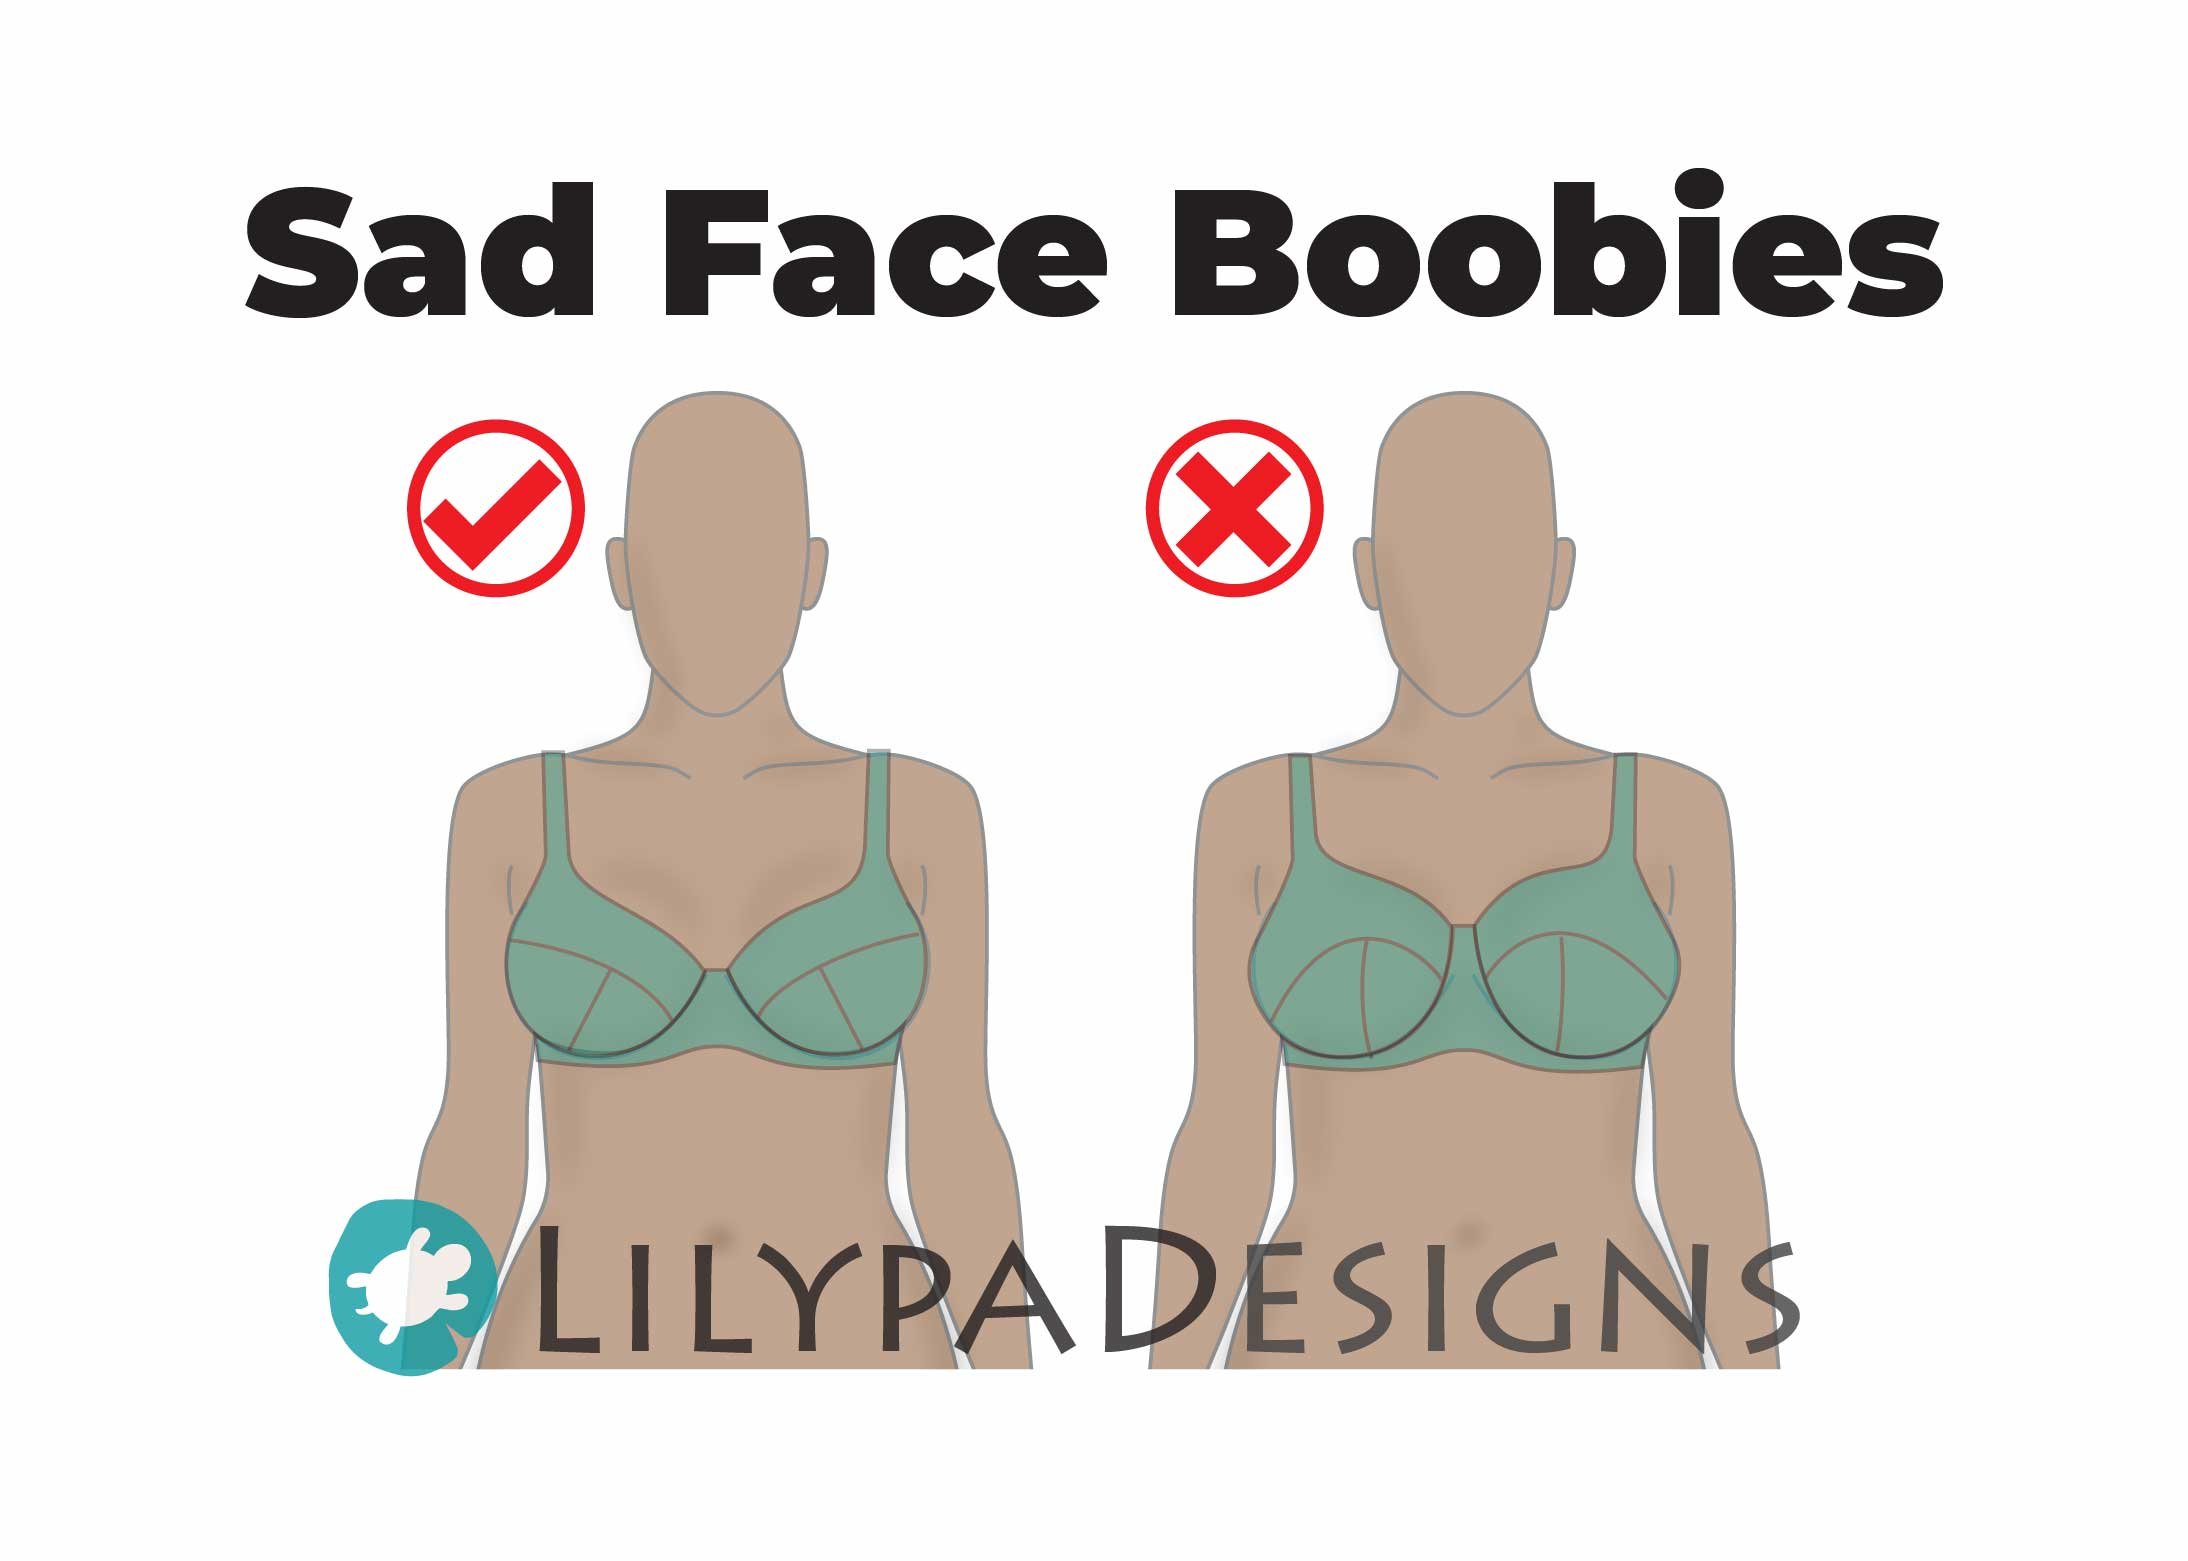
Sad Face Boobies

Cups are rotated outwards causing the seams to slope downward. Often accompanied with a center gore that is taller than the underarm.

Course(s): Projected Fit Issues, Full Framed Wireless Bra, Advanced Torso Challenges

*Recommended Courses may vary depending on pattern used


Too Short Wires

Wires rotated outward within the channeling where the underarm area juts out at an odd angle sometimes poking the arm. Occurs most frequently with Plunge or Demi wires.

Confirm wire length against pattern pieces or if using a LilypaDesigns pattern, confirm with Cradle Chart.


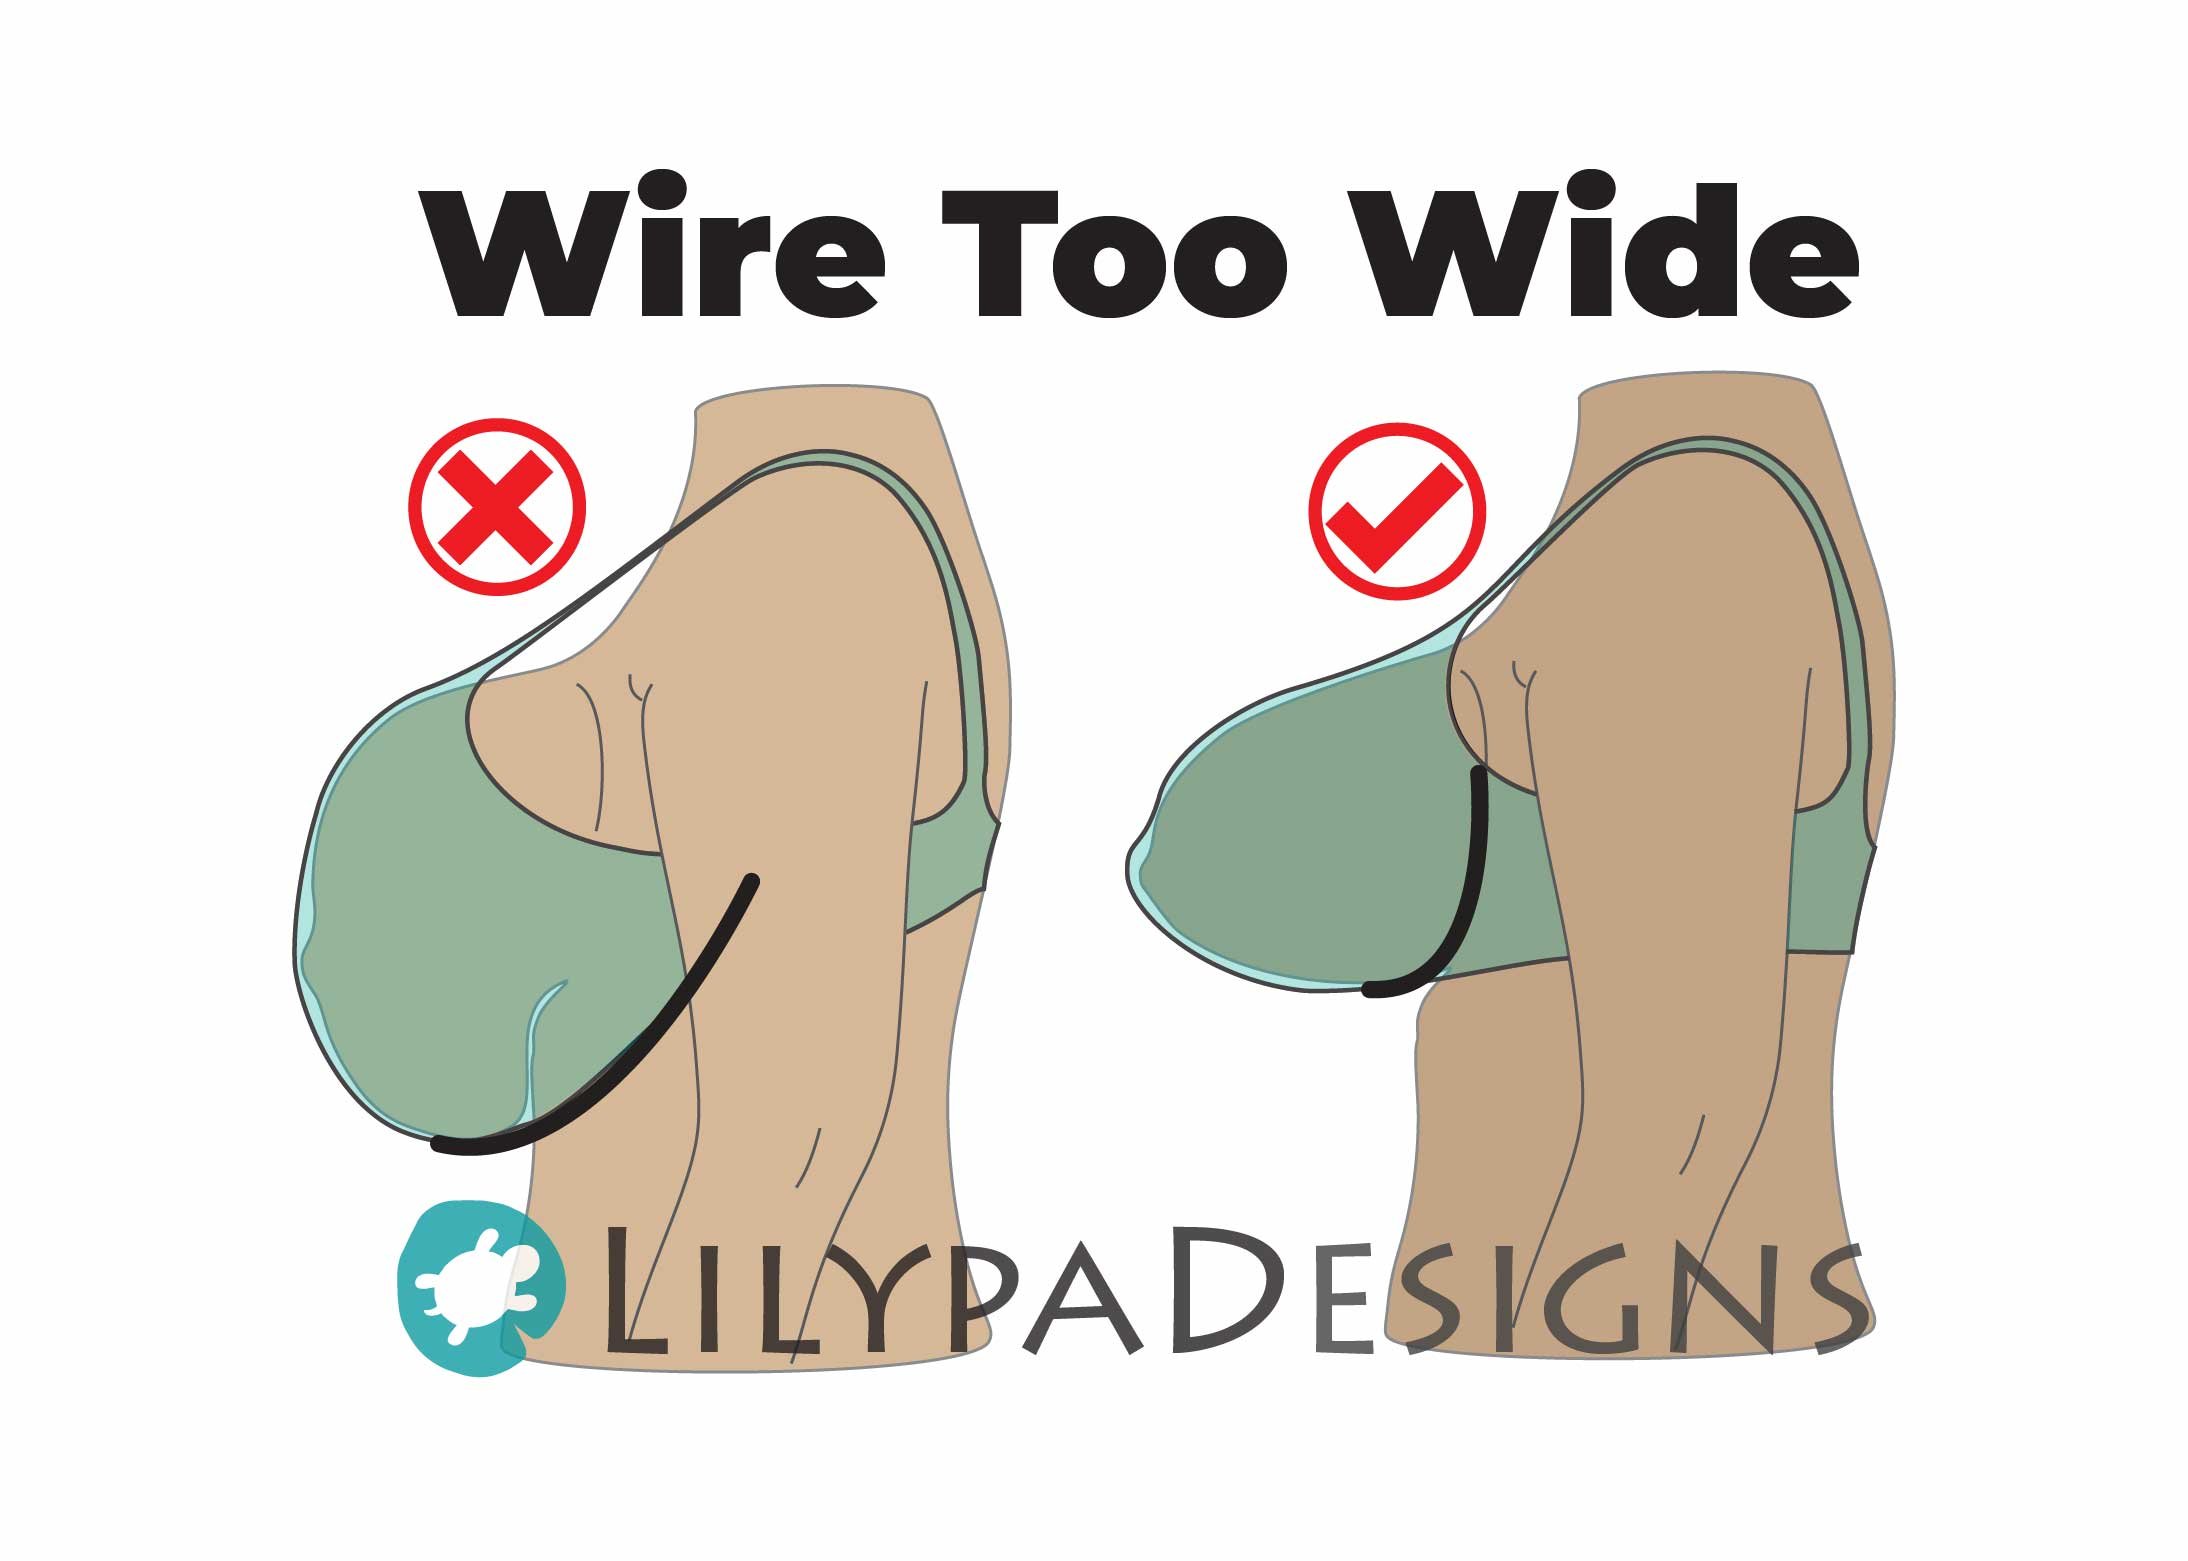
Wire Too Wide

Wires wrap around the body instead of sitting in the breast crease (Inframammary Fold). Often accompanied with breast compression and/or mounding - even when the cup volume is correct.

Course(s): Projected Fit Issues, Common Fit Issues

*Recommended Courses may vary depending on pattern used


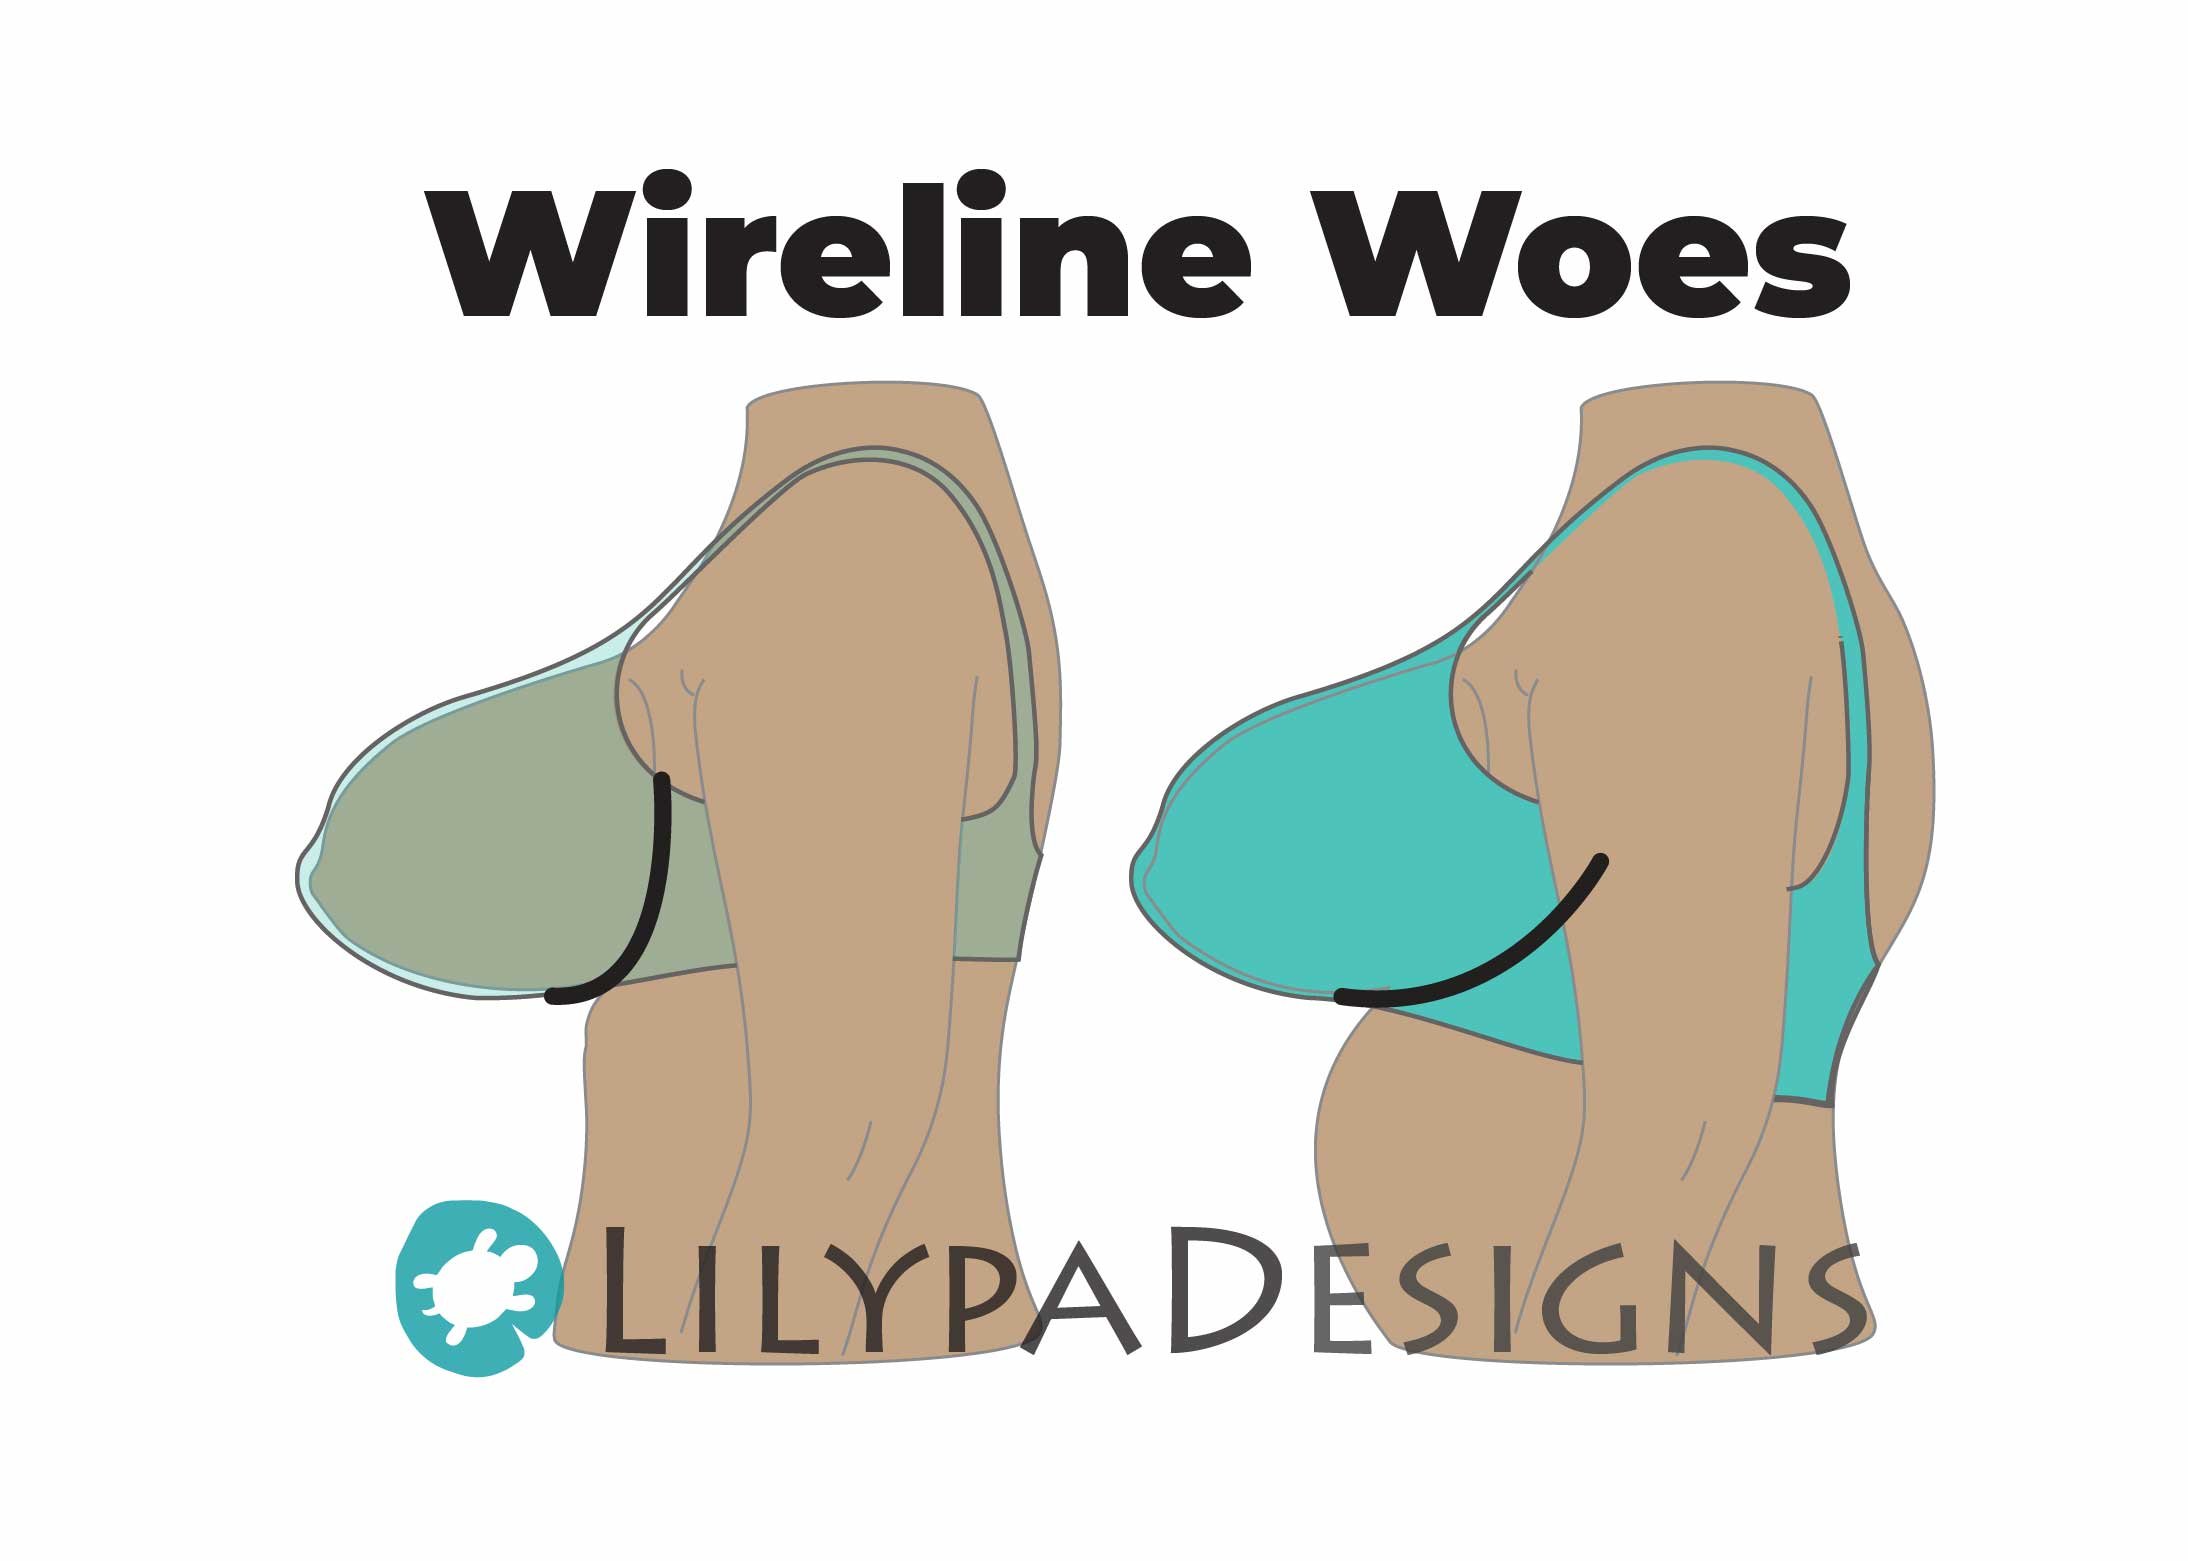
Wireline Woes

Wireline does not sit in your breast crease (Inframammary Fold) no matter how small or narrow the wire. Most often related to center gore and/or torso shape (ribcage).

Course(s): Advanced Torso Challenges

*Recommended Courses may vary depending on pattern used


 Technical Glossary

This Technical Glossary was initally created by Kimberly Hamilton of Kimtimates and is reposted here with our additions for educational purposes only.

 ————————————————————————————————

I've put together an ever-evolving glossary for words and terms you may come across in your sewing or pattern cutting of lingerie. Keep in mind, terminology can differ between brands and geographic regions, so if in doubt, clarify with your suppliers or colleagues.

To 'search' the glossary, use your shortcut key of ctrl + F (PC) or cmd + F (Mac) and enter the term you wish to find. 

If you can't find what you're looking for, have questions, or can offer more information or suggested edits, please leave a comment.  

2-Way Stretch Fabrics

This fabric stretches in one direction, usually from selvedge to selvedge, but can be in other directions depending on the knit. 

3-Step Zig Zag Stitch

Used on elastics, this stitch will make a 'dashed' zig zag line. This reduces the chance of the stitches cracking, or breaking, when the elastic is stretched. It will commonly be seen on the underband or underarm elastics, particularly on large cup or band bras that may face a lot of stress. 

4-Way Stretch

Four way stretch fabrics, such as those that contain high amounts of elastane, stretch in both directions, crosswise and lengthwise. 

Apex

In North America, the apex of a bra will refer to the deepest part of the cup, traditionally where the nipple would rest. In the UK, the apex will refer to the highest vertical point of the cup, usually where the shoulder strap attaches. 

Asymmetrical Grading

This is the grading system used on D/DD+ cup sizes where the grading increments will be applied unequally to the cup. The outer section of the cup will have larger grading increments than the inner/centre front section of the cups in order to keep the point of bust balanced. Apply a balance of of 1/3 of the measurements to the centre front and 2/3 to the outer. 

Bagging / Bagged Out

A construction method where the seam allowances will be enclosed inside of the garment so that the edge does not require any further finishing. Swimsuit linings and gussets are often bagged out.

Balance Point

The deepest point of your underwire when resting on an X-Y axis. This point will align with the deepest part of your cup when sewn into the cradle/frame. 

Band / Underband / Wing

The back portion of the bra, usually made with a strech fabric, such as powernet. Larger cups will require a firmer fabric, or two layers of a light or medium weight stretch fabric. 

Bartack

A type of reinforcing stitch of a very small and tight zig zag stitch used in lingerie to secure seams, such as at the ends of elastics, shoulder straps, but most often at the ends of the wire casing to keep wires securely in place. 

Bias

Cut 45 degrees from the vertical grain in fabric. In woven fabric this gives you a little stretch and also a beautiful, soft flare when you split and spread your pattern pieces. 

Block Pattern / Sloper

A block pattern is a simple pattern that you can modify and manipulate into a variety of new patterns. A block pattern does not have the seam allowances on it for easier modifications. 

Bobbinette / Bobbinet / English Net / Cotton Tulle

A very special tulle fabric invented by John Heathcoate in 1806. This is a uncommon material made by very few factories in the world on 100+ year old machines. Often used in couture dressmaking, corsetry, lingerie and base cloth for fine embroidery. Traditionally made of very fine cotton, it is now available in silk, nylon and special “technical” fabrics (think fishing nets and high quality wigs).

Bonding / Fusing / Ultrasonic Welding

A sew-free process using adhesive tapes, heat or ultrasounds to bind fabrics together without thread. This produces a flat, chafe-free seam, or offer waterproofing protection to outerwear. 

Boning / Rigilene

Rigid strips of plastic, metal, spirals used to support garments and contour the body. 

See also Flats and Spirals. 

Bone Casing / Channeling 

Not to be confused with wire casing or wire channeling, bone casing is wider to accommodate wider bones in corsets, basques and bustiers. It can be purchased pre-made a a tube to insert a bone, or made with a strip of bias fabric folded to make a tube-like shape. They are sewn to the garment with two rows of parallel lockstiches.

Breast Root

The breast root, or inframammary fold, is where the breast attaches to the torso. Underwires should follow the shape of the breast root for comfort. See Breast Root Trace for more details. 

Busk

A rigid closure for a corset typically placed in the centre front.

Calico / Muslin / Toile

A woven, unbleached fabric that can be used for toiles and samples. It is not suitable for toiles that will end up in lightweight, woven, silk fabrics, or those with stretch. It is usually economical for sampling and is good for marking and annotating any fit or construction comments. 

Centre Front / Gore / Bridge (see also Cradle/Frame)

The centre front piece of the bra, also sometimes referred to as the gore, is the fabric that connects the cups. It should be made of a non-stretch fabric for stability and support. 

Chain Stitch

A chain stitch is a sewing stitch that forms a series of looped stitches with a chain like appearance. A Chain Stitch can easily be removed by pulling one thread. A Chain Stitch machine with a Nylon looper thread will sew a 'stretch' lockstitch, ideal for attaching bias bindings. 

Circular Knitting Machine

A form of knitting in the round to create a seamless tube. This is how such things as socks, hoisery and seamless bodywear is created. 

Compass

A drawing tool used to draw circles or arcs. This tool is particularly handy for manual pattern drafting to plot points and intersections based on measures. 

Core Sizes

In lingerie, core sizes traditionally refers to cups A - D/DD and bands 32 - 38. 

Coverhem / Coverstitch / Chainstitch

This machine is perfect for hemming knits as you'll get a stretchy line of stitching using 1, 2 or 3 needles and a nylon bulk looper thread. One needle will produce a chainstitch, and two or three needles will give you the hem like those on t-shirts and leggings. This machine can also be used for elasticating swimwear. 

Cradle / Frame (see also Centre Front/Gore)

The cradle, or frame of your bra, is the portion of the bra to which the cups, and wires, will be attached, with the band attached to the sides. A bra with a split cradle, will have a seam underneath the breast, usually near the balance point. It is important that the centre front of a bra be made of a rigid (non-stretch) fabric. 

Cross-Grading / Sister Sizing

Cup sizes are not created equal and will vary in volume depending on the band size. There will be equal or equivalent cup volumes in cross-graded sizes. Example, a 34B cup volume is equal to a 36A, 32C and 30D. Cross-grading also applies to the sizing of pre-formed cups and underwires, which is typically based on a B cup size. Therefore a '40' cup or wire, could be used to produce a bra in 40B, 38C, 36D, or 42A. 

Cut & Sew Foam

A sheet of foam that  can be cut and sewn together to produce a cup shape. Cups made of cut & sew foam can usually be folded inside out for packaging and transportation, or machine washed. Never fold foam, you will not have seam allowances on overbust or underarm seams. 

Denier / Stabilizer / Tricot / Sheer Cup Lining / 15 denier tricot / Sheer Tricot / Marquisette

This fabric has various names and many products are incredibly similar. Be aware of fabrics that are completely rigid, and those that have a mechanical stretch. Denier is normally a strong, transparent, lightweight, synthetic, rigid fabric. It is a warp knit but it has usually be industrially finished so it has no stretch. It is used to prevent garment areas from stretching and an also be found as a tape for covering seams. Denier can be used as a backing to laminate fabrics that stretch, therefore making them rigid. 

Die Cast Rings & Sliders

These components have been moulded and typically have rounded, smooth edges.

Digitizer

A digitizer will be used alongside CAD software to convert flat paper patterns into a digital pattern using a specialist board and 'mouse' or 'pen' to transfer the information electronically. 

DOGS (Direction of Greatest Stretch)

This term is frequently found in home sewing bra making forums. It refers to the direction of the grain on a stable knit that has the most mechanical give.

Draping

A method to create garments by arranging fabric on the body or a dress form or stand.

​Dress Form / Bust Form

A helpful tool in the sewing studio to drape fabric, model patterns on the stand, fit samples to, or display finished garments.

Ease 

Allowance added into pattern pieces so the body can move. 

Edgestitch / Pinstitch 

To lockstitch close to a finished seam or edge.

Elastane / Spandex / Lycra

A synthetic fiber known for its incredible elasticity. Elastane and spandex are generic terms for the fiber, with Lycra being a brand name. 

Embroidery 

Often confused with lace, embroidery always has a base cloth of a simple net or tulle onto which the embroidery threads are stitched. 

End Caps

The small steel caps will cover the sharp, cut ends of spring steel boning used for corsetry. They are available in different widths to match the widths of spiral steel. See also Spiral Steel Boning. 

Flat Steels

Flat steel boning is used in corsetry, can also be referred to as Spring Steel Boning. They are made of strips of thin spring steel, with the cut ends blunted and then covered with a rust protective coating.  Flat steels are available in a variety of widths, and can also be bought by the meter on a roll. See also Spiral Steel Boning.

Flexi-Curve

A flexible curve or ruler useful for drawing curved shapes, or for completing a breast root trace. 

Fit Model

The person that garments are adjusted to for fit. It is important to select someone suitable to your target market, and can consistently maintain their measurements. 

Fortitube

A brand of wire casing/channeling from Stretchline, known for its strength, patented as puncture resistant.

French Curve

Templates made of various curves for hand-drafting patterns.

Grading

The formulae for creating different sizes based on a single base or core size, originally invented in Germany in the early 1900s by clothing production engineers. (FAUST, M-E., and CARRIER, S. (eds.), 2014)

Grainline

On woven fabrics, the grain line is the warp thread, which is the longwise thread stretched on the loom. The 'longwise' direction of the fabric. 

Greige 

Fabric that has not yet been bleached or dyed is referred to as 'Greige'.

Golden Sample / Sealed Sample / White Sample

Sampling terminology will differ from company to company. Typically a golden or sealed sample will be a sample that most closely resembles the final product and may be the last sample and approved for production. A white sample may also be a final sample, only produced in an alternate colour, such as white. 

High Point of Lace (HPOL) / Peak

When pattern cutting lace or embroideries with a scallop or galloon edge, it's important to plan for and mark the High Point or Peak in order to make sure that the aesthetic is as desired, and that all trims are captured within seam allowances. This is the 'highest' point in a scallop.

Hold Point

The Hold Point will be marked on a lace or embroidery pattern piece to signify an absolute for where the pattern piece must be placed on the fabric. 

Hook & Eye Closure

Hooks and eyes are fairly standard in terms of design, but are available in different widths, number of columns and materials. The most commonly seen hooks and eyes have 1, 2 or 3 rows of hooks and three columns for adjustments. They do come in standard widths, 1 hook being approximately 18/19mm, 2 hooks in either 28-30mm or 38mm, and 3 hooks at 57-58mm. 

Hook & Eye Tape

Also available by the meter, hook and eye tape will be required for longer closures like those on the back of basques and bustiers. They can be cut to the desired length and the edges finished with a small zig zag, like a satin stitch.

J-Hook

A specialty component for the shoulder straps of a bra. Available in both a ring and slider form, a small protruding 'J' on the back of one shoulder strap component will hook to a corresponding ring or slider on the other strap. This will result in a racerback style bra. 

Knit Fabric

The fundamental unit of all knitted fabrics is the knitted loop. It is formed when a loop of continuous yarn is drawn through a previously made loop. Lingerie uses many sophisticated and technically functional knitted fabrics. 

Knit / Crochet / Kohler Elastics

This type of elastic construction produced elastics with a softer stretch and modulus. They are particularly suitable for use on lightweight briefs where a more gentle finish is required. These are the ones that 'unravel' in wash & wear.

Lace

Not to be confused with embroidery, lace is woven together with a network of threads. Various widths and types of lace are available and designs can be made into stretch or rigid lace. I'm no expert on lace, so for further reading, enjoy this article.

Lamination

Bonding two or more fabrics together with a polymer film using a heated press. Delicate fabrics can be laminated to heavier, more stable linings to make them fit for purpose. 

Lay Plan / Marker Making

Your lay plan will specify how the pattern pieces will be cut from the sheet of fabric to make the most out of your usage, therefore reducing waste and cost. Marker making is another name for a CAD lay plan.

Lectra Modaris

A CAD (Computer Assisted Design) program used by fashion and apparel designers. This professional software can be used to develop and grade patterns. It is highly popular for lingerie design in the industry. Competitor brands include Gerber, Assyst and Vetigraph. 

Lockstitch

Industry term for 'single needle stitching'. The most common mechanical stitch.

Loop Turner

Used to make rouleau straps (see Rouleau), this long metal tool with a hook on the end can be used to turn a tube of fabric right side out. Stitch a narrow tube of fabric right sides together. Insert the tool into the tube, using the hook to latch onto the other end. Pull the fabric back through the tube in order to be right side out, using your fingers to manipulate it through.

Low Point of Lace (LPOL) / Valley

Used when pattern cutting pieces using lace or embroidery with a scalloped edge. Notations will be made on the pattern to indicate where the piece should be place. The low point, or valley, will be the lowest part of the scallop in the repeat on the finished edge.

Mechanical Stretch

Fabrics that have stretch properties but no not use elasticated yarns. The stretch is usually created in the finishing process. Some cup linings are engineered to have a mechanical stretch. 

Method of Make

The step-by-step instructions on how to sew your garment. 

Modulus

Describes the stretch and recovery properties of elastic materials. 

MOC - Minimum Order Colour

Industry term for the minimum order of the goods per colour.

MOQ - Minimum Order Quantity

Industry term for the minimum order of the number of goods. 

Modelling on the Stand

Creating ideas for garments and pattern pieces directly in 3-dimensions on a dress form or stand. 

Moulded / Molded / Pre-formed Cups

Using a machine with projected barrels to mould a shape into a flat sheet of foam. A variety of shapes and sizes are available, as well as different materials. Pre-formed cups are sized like underwires, based on the B cup size. 

Negative Ease

When making garments with elasticated fabrics that conform to the body, negative ease must be added for a firm fit. Therefore, the garment will be made smaller than the wearer's actual measurements.

Nylon Covered Rings & Sliders

These components have been covered with a plastic nylon coating. This coating can be dyed.

Nylon Thread / Wooly Nylon / Nylon Bulk

A 'puffy' thread used in seams with stretch. It is traditionally used as a looper thread on an overlocker/serger or coverhem machine. Some varieties can be used as a needle thread. 

Overlock / Serger

A sewing machine that can use up to 5 different threads and three sewing needles. There is often a cutter to cut the raw edge of the fabric, while the stitched edge wraps around the cut edges to reduce fraying and give a clean, finished edge. 

​Pattern Master

A specialist ruler used for drafting patterns. Available in metric or imperial measurements, this ruler has a straight edge as well as a curved edge.

Plus Sizes

Within the lingerie industry, plus sizes typically refers to those that are D/DD+ in cup size, as well as those over a 38 inch band size. 

Picot

Is a loop of thread designed for function or decoration along an edge of lace, embroidery or elastic. The loops may vary in size according to their function or aesthetic.

Plastic Rings & Slides

Plastic rings and slides are moulded from plastic. They can be produced in a rainbow of colours and some are dyeable.

Plotter Printer

A printer that will handle oversized paper available on a roll. There are various printer and corresponding paper widths available depending on your needs. 

Point of Bust

The deepest and fullest point on the breast, usually the nipple. Seams on bras typically intersect with the point of bust and will be the deepest point of the cup or where multiple pattern pieces intersect. In North America, 'Apex' will refer to the deepest of the breast and bra. 

Polyester Thread

A smooth and durable choice for lingerie. There are many different brands and qualities on the market. Invest in good quality thread that is smooth, free of bumps or slubs, without excess fuzz, and have a tight, smooth, consistent twist. It will keep your machine much cleaner which means fewer problems for you.

Powernet / Stretch Mesh

This knitted fabric is available in a variety of weights from extremely light and fine to ultra heavy and controlling. Powernet in various weights and modulus is commonly used in bra wings, briefs, swim, suspender belts, bustiers, basques and shapewear. 

Punched / Stamped Metal Rings & Sliders

These components have been punched into their shape from a sheet of galvanized metal. They will have flat, blunt edges. 

Quality Control

Throughout the production process, a number of quality control checks will be done. Fabrics will be inspected prior to making the lay plan and cutting. There may be quality control checks while machinists sew, with measurements being taken to compare to tolerances. A final quality control check will be done prior to the goods leaving the factory with a variety of points checked. Quality control checks should continue when the goods are received into inventory at their final destination. 

Rings

Lingerie rings can be used to connect two pieces of fabric or elastic together for either function or decorative purposes and can come in a variety of shapes, sizes, materials and colours. Used primarily as a connector on shoulder straps to allow for the strap to freely adjust and vary strap angle. When using rings for elastics, choose a ring just slightly smaller in diameter than the width of the elastic. 

Rouleau / Rouleaux / Spaghetti Strap

By cutting a very narrow strip of fabric and sewing a 'tube' you can make a small strap, loop or decorative element when turning the loop right side out. A loop turner is a handy tool for the sewing kit. 

Sample Size / Base Pattern Size

This will be the size that the garments are drafted and fit to. Lingerie industry sample size is typically 34B and in the UK, bottoms a size 10 or 12. 

Seam Allowances

In lingerie, seams are kept small, usually 5mm for Metric measurements, and 1/4" (approx. 6mm) for Imperial measurements.

Seamless

Seamless cups are made by using a moulded machine, like the ones used for making foam cups. Knitted garments can also be knitted in the round on a circular knitting machine. This is popular for shapewear and hoisery. Some bonded/fused/ultrasonic welded items are referred to as being seamless as they are not stitched together. 

Seam Tape

Seam tape is a small strip of nylon denier that is then folded with a binder and usually stitched in place with a twin needle machine to cover the inside seam allowances on garments to add strength and comfort. 

Selvage / Selvedge

Ss a self-finished edge of fabric. The selvages keep the fabric from unraveling or fraying. The selvages are a result of how the fabric is created. The selvage edge runs along the top and bottom edges of the fabric. 

Slides / Sliders

Sliders are used to create adjustable straps. They can also be available, like rings, in a variety of shapes, sizes, materials and colours. Sliders with wider openings are good for very thick or textured elastics, as well as elastics that have been covered with fabrics, like on swimwear. Choose a slider that is nearest or an exact width to your elastic. 

Shirring / Ruching

Gathering fabric. It can be done by using an elasticated thread as the bottom thread, wound around the bobbin. 

Sling / Side Sling / Side Panel / Powerbar

A cup pattern piece that runs along the underarm edge of the cup to direct the breast forward. It can be a pattern piece built into the cup, or an internal piece hidden for support, or a aesthetic element. For more information about slings enjoy this article. 

Spacer Fabric

This lightweight foam can be moulded and has an inner core that is incredibly lightweight and flexible. 

Spiral Steel Boning 

Looks like a flattened coil, made up of a variety of small wires twisted together. It is a flexible bone used primarily in corests, basques and bustiers.

​Stretch Test

A stretch test will determine the amount of stretch in your fabric or elastic and is helpful when calculating negative ease. For more information about doing a stretch test enjoy this article. 

Strip-Cut Elastics

A thin film of rubber or plastic that has been strip-cut into lengths of tape. It is cheap to produce and can give a lighter or stronger finish depending on the thickness of the film. The rubber version is often used in swimwear and men's underwear. The see-through plastic (Framalon) can be used in a variety of ways, but most commonly used as a narrow colourless strip sewn to the back of a stretch lace or embroidery to give more support around a neck or leg edge. 

Suspender Ends / Suspender Grips / Suspender Tabs

Traditionally a shaped clip with a rubber backer, this component will clip to the top of your stockings to hold them in place. Four is the minimum number required, one for the front and back of each leg.

Symmetrical Grading

This method of grading is most suitable for core size. Symmetrical grading will have the pattern piece grow symmetrically to the left and the right, and up and down. So, the amount of growth you add to the left, will be the same as the right, and the increment you add to the top, will also be the same as the bottom.

Technical Flats / Drawings

Technical flats are thumbnails of the garment design and typically include stitch details and back views, along with any complicated internal structures or detailing. 

Technical Pack / Product Data Management (PDM)

A production technical pack can vary extensively depending on your product and the requirements of your factory. It can include such things as a method of make, usages, measurement charts and tolerances, cutting instructions, a lay plan, packaging and label requirements.

Toile

A garment sample or prototype usually made up of less expensive fabrics to test shapes, construction, fit or design details. 

Tulle

A lightweight net fabric with a hexagonal structure that does not unravel. Commonly made of nylon, it is soft to the touch, strong and supportive with mechanical stretch only. Also see Bobbinette.

Tolerance

Tolerance is a plus or minus measurement used to evaluate whether the product meets a quality standard. Tolerance can be applied to pattern drafting, especially in CAD programs where seamed edges can be measured. Typically used to measure finished garments to ensure they meet specifications for quality control. For bras, tolerances are particularly small and if a garment is a few mm too big or too small, it will be noticeable in the fit. 

Twin-Needle Machine

A lockstitch sewing machine with two needles and two separate bobbins to create parallel rows of stitching. This machine is used for sewing on wire casing (usually 6 or 8mm spacing between the needles) and seam cover tape (usually 6mm spacing between the needles). 

Underwire 

Typically a semi-rigid wire used in bras to support the breasts. They come in a variety of shapes and sizes as well as materials, including plastic. Underwire sizing is usually based on a 'B' cup size and wires can be cross-graded to be used for all of  the other required sizes. 

Usage / Fabric Yield

When planning your production, you will need to calculate the usage of each fabric and trim in order to purchase and ship enough fabric for producing your goods. This will also help you determine an accurate cost price for the quantity of each material used in the product. 

Useable Width

This is the width of the fabric that you can actually use for the garment. Selvages are removed and this width will be required to calculate your usage. 

Warp

Warp threads run the length of your fabric.

Wastage

This will be the amount of fabric that is wasted to produce each product, as there will be a small amount of unusable fabric surrounding each pattern piece. Professional and experienced lay planners, along with specialist software can assist in plotting the best way to cut the fabric to minimize waste, which in turn reduces costs. 

Weft

Weft threads run from side-to-side creating your selvages. 

Wire Casing / Channelling

Wire casing is used to insert the underwire into a bra, These are tube-like fabrics that will be stitched in place with two rows of parallel lockstitches. Wire casing typically has a soft or fleecy side which is worn against the skin. There are many varieties available, and some brands include foam layers within their casing for comfort. 

Wire Play

Underwires in the casing require a bit of ease for movement and flexibility. Wire play should fall between 10 and 16mm. Too much or too little wire play can result in the wire pushing through the casing, including the outer fabric of the bra. 

Wire Spring / Wire Splay

When drafting a bra pattern, a wire will need to be sprung open as it would be on the body when under tension from the band. In core sizes, the wire is typically sprung under the arm upwards of 15 - 20mm. In DD+ cup sizes, the wire may be sprung both at the centre front and the underarm upwards of 5omm. 

Woven Fabrics

Weaving is one of the oldest methods of producing cloth. They are formed by the interplay of warp and weft threads. 
Woven Elastics

Weaving is the most flexible way to manufacture narrow elastics, carefully controlled to produce strong and stable elastics. By varying the yarns used and the structure, technical functions can be built into the product. 

X-Y Axis

An X-Y axis can be  used to draft and grade pattern pieces both manually and in CAD. The X-axis runs horizontally, and the Y-axis vertically. 

Zamak/Zamac

This is a metal alloy made primarily of zinc, along with aluminum, magnesium and copper. This alloy composition is crucial for use in metal swimwear accessories, such as clasps, as it doesn't conduct heat as well as other metals, therefore will not get hot in the sun. 

Zig Zag

A zig zag stitch is a back and forth stitch which is useful for sewing ​stretch fabrics. In lingerie, elastics are attached with a zig zag stitch.