TUTORIAL - Omega / Narrow Root Adjustment Akeru Front Close
Learn how to adjust the Akeru Front Close bra for those with Omega or Narrow Root shapes. If the side seam of your Akeru muslin sits a bit too far back, there’s a good chance you’ll need a Omega/Narrow Root adjustment. One of the challenges to designing a bra pattern with only one (extensive) size range is the inability to incorporate certain LilypaDesigns norms such as increased projection and built-in Omega/Narrow Root adjustment in the larger cup sizes.
Due to the style of the bra, the cups are designed to compress breast tissue a bit in order to achieve that wonderful décolleté. For this reason, if your measurements fall between 2 sizes, go with the larger one.
The overall concept remains the same where you want to maintain the width of the larger Horizontal Hemisphere (HH) size but the width of the smaller cradle and wire size. Depending on the height of the breast root, you may need to keep the height of your larger HH or the smaller cradle size.
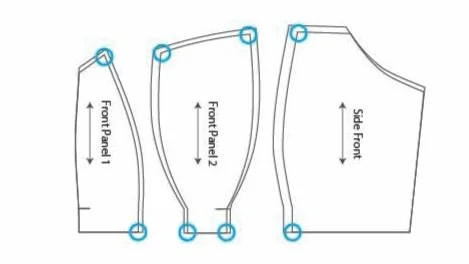
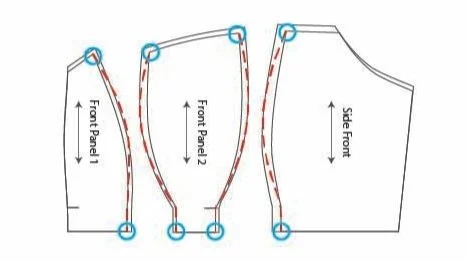
Larger HH with Short Roots
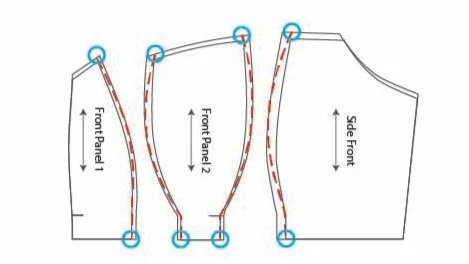
Maintain cup height and increase width (HH).
Maintain cup height and increase width (HH).
Start by circling the corner of the smaller Cradle size at the top and bottom of the pattern pieces [blue]. Then draw a curved line connecting the two corners of the pattern piece [red] but curving out the middle “peak” to the larger size. We want to maintain the height of the original while increasing the width (Horizontal Hemisphere). Remember, none of the seams coincide with the bust point - ensure this continues to be the case when making alterations.
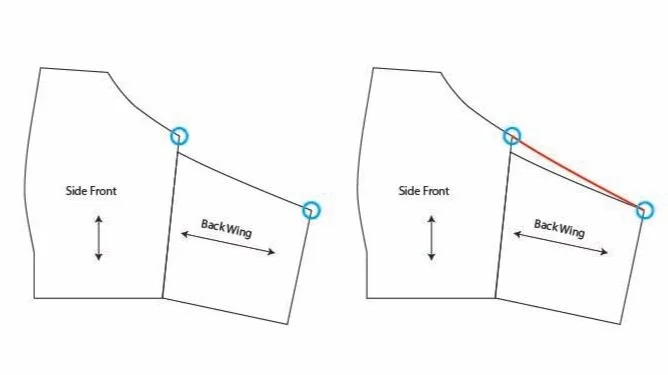
Increase height of the Back Wing along side seam to match the Side Front.
Lastly, select the group of back wing that matches the cradle size. Circle the top right corner of the larger Side Front and the smaller Back Wing [blue]. Then draw a gently curved line connecting the two top corners [red]. Add seam allowance back and you’re ready to rock.
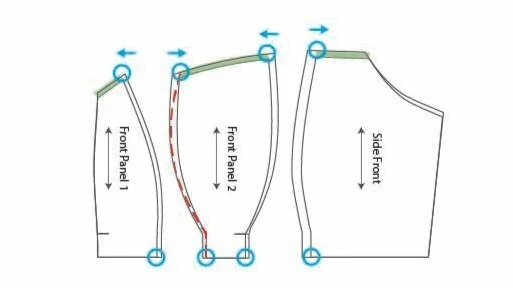
Larger HH with Tall Roots
Maintain taller height and width but smaller cradle and neckline.
Maintain taller height and width but smaller cradle and neckline.
Start by circling the corner of the SMALLER cradle size at the bottom of the pattern pieces [blue] and the LARGER cup size at the top. Shift the upper circle so it is the neckline is same length as the smaller size [green]. Then draw a curved line connecting the two corners of the pattern piece [red] but curving out the middle “peak” to the larger size. We want the taller height and width (Horizontal Hemisphere) of the larger size but smaller cradle and neckline. Remember, none of the seams coincide with the bust point - ensure this continues to be the case when making alterations.
Increase height of the Back Wing along side seam to match the Side Front.
Lastly, select the group of back wing that matches the cradle size. Circle the top right corner of the larger Side Front and the smaller Back Wing [blue]. Then draw a gently curved line connecting the two top corners [red]. Add seam allowance back and you’re ready to rock.

