TUTORIAL - How to Alter the Bottom Cup Depth of the Momiji Bralette Pattern
Learn how to alter the Bottom Cup Depth (vertical length) while keeping the Horizontal Hemisphere (horizontal length) of a curved 3 piece bra cup! While this tutorial is tailored for the Momiji Bralette, the methodology can be used for ANY bra pattern with a similar seamlines. That said, this is ONE method of increasing/decreasing the bottom cup depth (BCD) of the cups in detail and utilizing the “Layers” option in Adobe Reader (FREE). For a primer using Layers in Adobe Reader, click [HERE]
IIn our previous sample [HERE], Heidi’s measurements indicate:
Horizontal Hemisphere (HH) = size 14.9cm/5.9”
Bottom Cup Depth (BCD) = size 12.5cm/4.9”.
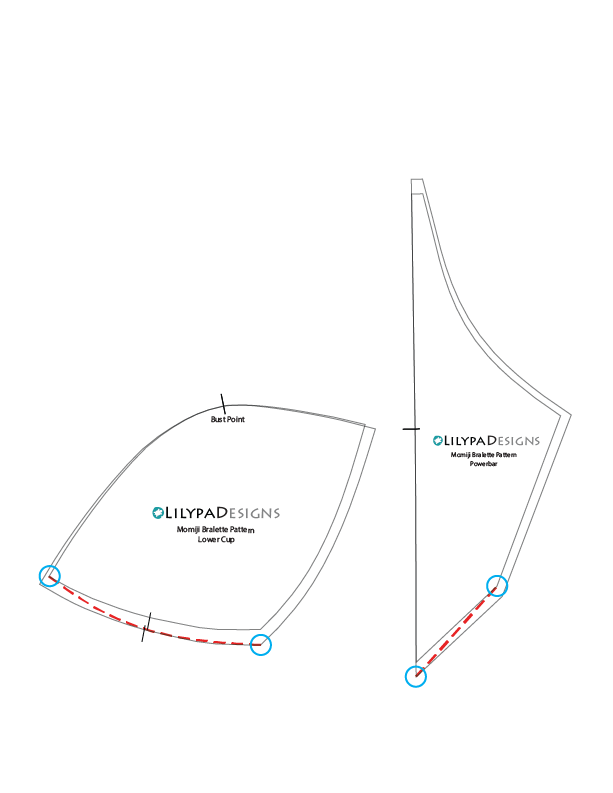
This means she needs the volume of the larger HH but a shorter BCD. We can accommodate that by reducing the BCD of the 14.9cm/5.9” to 12.5cm/4.9”. Begin by removing the seam allowance.
Larger Cup Size and Smaller BCD
Maintain cup width (HH) and shorten bottom cup height (BCD).
Start by circling the corner of the smaller BCD and the corner of the larger size [blue]. Then draw a gently curved line connecting the two corners from the same pattern piece [red]. We want to maintain the width (Horizontal Hemisphere) while shortening the height (Bottom Cup Depth). If your adjusted pattern piece has the same width but is a little shorter, you’re done!
Smaller Cup Size and Larger BCD
Maintain cup width (HH) and extend bottom cup height (BCD).
Start by circling the corner of the larger BCD and the corner of the smaller size [blue]. Then draw a gently curved line connecting the two corners from the same pattern piece [red]. We want to maintain the width (Horizontal Hemisphere) while lengthening the height (Bottom Cup Depth). If your adjusted pattern piece has the same width but is a little taller, you’re done!
For those who have a significant difference between the BCD and HH measurements and/or need a smaller powerbar, additional adjustments maybe needed detailed below.
Maintain angle of powerbar point of the original by shortening the side seam.
Align the cradle, powerbar and back wing along the side seam. Adjust the point of the bottom angle of the powerbar so that it matches the original by shortening the side seam. Shift the powerbar down [red] so the 3 pattern pieces intersect nicely again. Shorten back wing to match by drawing a gently curved line from the powerbar to the opposite corner [blue]. To maintain the side seam height, redraw the underarm curve to match the original.


